Views
Workbench for Zephyr adds its own icon to the Activity Bar. Clicking it opens a side bar with six views. The extension also adds status bar buttons, a bottom panel, a terminal profile and a few entries in the standard VS Code Explorer. This page is a reference of all these surfaces. Follow the links for the details of each feature.
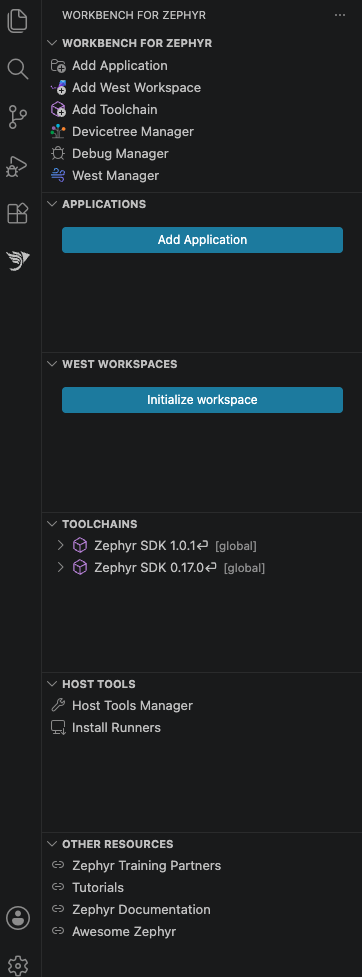
Workbench for Zephyr (shortcuts)
The top view is a list of shortcuts to the most used features:
- Add Application: open the wizard to create or import an application.
- Add West Workspace: open the wizard to create or import a west workspace.
- Add Toolchain: open the wizard to install or import a toolchain.
The "Managers" view below it opens the managers:
- Devicetree Manager: open the Devicetree Manager.
- Debug Manager: open the Debug Manager.
- West Manager: open the West Manager.
- AI Manager: open the AI Manager.
Before the host tools are installed, two extra rows appear at the top: Install Host Tools and Install Host Tools (Advanced). They disappear once the installation completes. See Installation and Advanced Host Tools.
Applications
Lists the Zephyr applications of your multi-root workspace. Each application row shows the attached west workspace (for example [with zephyrproject]). Hovering the row reveals inline buttons: Build, Gui Config, Flash and Debug. The view title bar has an Add Application (+) button and a Refresh button.
When an application has several build configurations, each configuration appears as its own child node with a [active] or [not active] badge and its own Rename, Delete and Set Active / Set Inactive actions. See Multibuild.
Child rows
Expand an application to see its configuration:
-
West workspace row: the attached workspace and its Zephyr version. Right-click to Change West Workspace.
-
Toolchain row: the toolchain in use, with its variant as description (for example
[zephyr]or[iar]). A warning is appended when the toolchain is not fully compatible with the workspace's Zephyr version. Right-click to Change Toolchain. -
Board row: the target board identifier. Right-click to Change Board.
-
Flash runner: the default runner used by Flash, or
[not set]. Inline icons let you set it (Set Default Flash Runner), change it (Change Runner) or remove it (Remove Default Runner). Once a runner is set, right-click the row for Set Custom Arguments For Runner. See Flash and Run. -
custom arguments for runner: shown when extra runner arguments are set (for example
--erase). Right-click to Change Custom Arguments For Runner or Remove Custom Arguments For Runner. -
Arguments & Environment group:
- west Arguments: extra arguments passed to the west command.
- west Flags -D: CMake
-Dflags appended to the build. - EXTRA: the
EXTRA_CONF_FILE,EXTRA_DTC_OVERLAY_FILEandEXTRA_ZEPHYR_MODULESvariables. - Other environment variables such as
SHIELDandSNIPPETS.
Use the inline Add value, Edit value and Remove value icons on these rows. See Build system variables.
-
Code Explorer: a browsable file tree of the application. Files open on click. Right-click for New File..., New Folder..., Rename..., Delete, Open in Integrated Terminal, Reveal in Explorer View, Copy Path and Copy Relative Path.
Context menu
Right-click on the application:
- Build: build the application.
- Clean submenu:
- Rebuild/Pristine: fully clean the build folder, then build.
- Delete Build: delete the build directory.
- Delete from disk: delete the whole application folder (irreversible).
- Remove: remove the application from the VS Code workspace without deleting any file.
- Configure submenu:
- Kconfig Manager: graphical Kconfig editor. See Kconfig Manager.
- Gui Config: see Gui Config.
- Menuconfig: see Menuconfig.
- Harden config: see Harden Config.
- Sysbuild submenu: Enable or Disable sysbuild. See Sysbuild.
- Analysis submenu:
- Workbench Dashboard: see Workbench Dashboard.
- West Dashboard: see West Dashboard.
- Memory Analysis submenu: RAM Report, ROM Report, RAM Plot, ROM Plot, Puncover.
- Static Code Analysis submenu: ECLAIR Manager, DT Doctor.
- SPDX submenu: SBOM generation, verification and reports. See SPDX.
- Flash/Run: flash the application to the board and run it. See Flash and Run.
- Debug: start a debug session, or open the Debug Manager if none is configured. See Debug Session.
- Build Configuration submenu:
- Add Multibuild: add another build configuration. See Multibuild.
- Select Application: pick the active application when the west workspace declares several.
- Set Default Flash Runner: pick the runner used by Flash, with optional custom arguments.
- Change Board, Change West Workspace, Change Toolchain: reassign the target board, workspace or toolchain.
- Change IntelliSense Provider: switch between the C/C++ extension and clangd.
- Add Custom Task: add your own task (label, command, arguments) to the application's
tasks.json. - Python Environment submenu: Create local Python Virtual Environment, Set local Python Virtual Environment, Set global Python Virtual Environment. See Python environments.
- Open Containing Folder: open the application folder in your file manager.
- Open in Explorer: reveal the folder in the VS Code Explorer.
- Open Terminal: open a Zephyr Workbench terminal with the workspace environment and all the environment variables loaded, opened in the build directory (or the application folder if it has not been built yet).
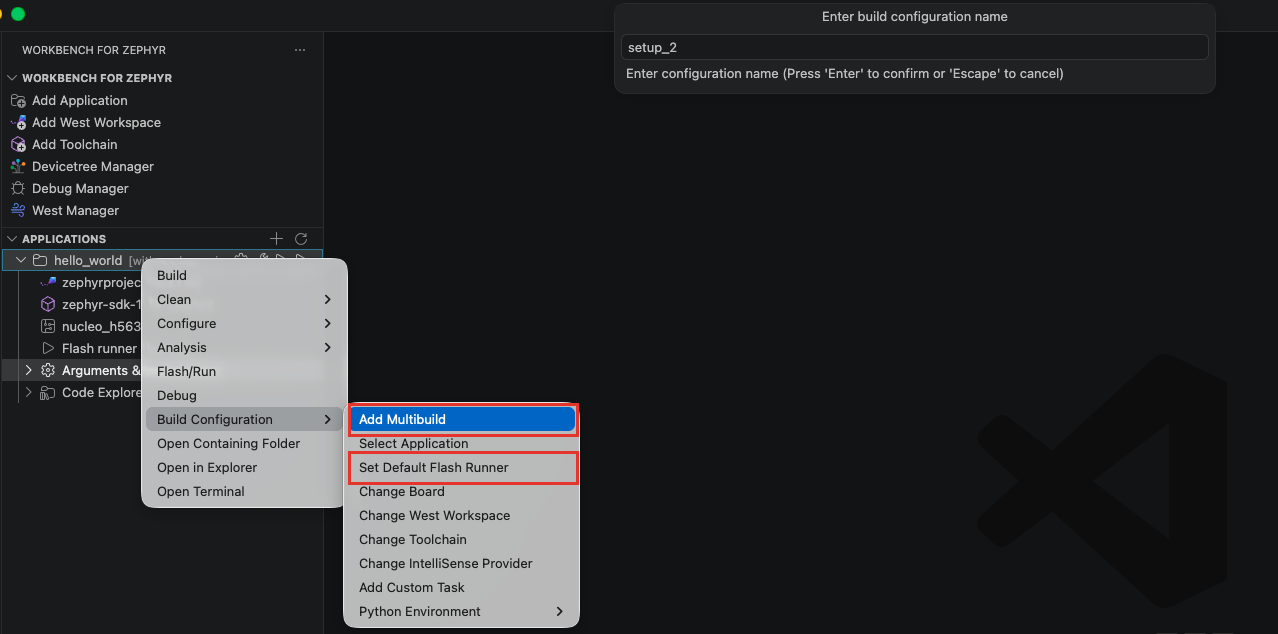
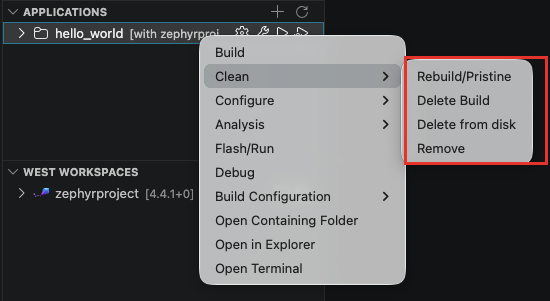
Build configuration nodes have the same context menu, restricted to the selected configuration. Their Clean submenu only offers Rebuild/Pristine and Delete Build. Their Build Configuration submenu keeps only Set Default Flash Runner and the Change entries.
West workspaces
Lists the west workspaces of your VS Code workspace. Each row shows the Zephyr version (for example [v4.2.0]). Hovering the row reveals Open Terminal and Install Python Dependencies buttons. The view title bar has an Add West Workspace (+) button and a Refresh button.
Expand a workspace to see:
- Applications group (only when the workspace declares applications): one row per application. When there are several, the selected one is ticked. Right-click on an application > Select Application to switch.
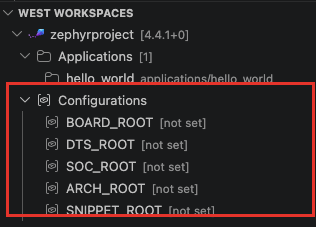
- Configurations group: the
BOARD_ROOT,DTS_ROOT,SOC_ROOT,ARCH_ROOTandSNIPPET_ROOTvariables, each showing[not set]until a value is added. Use the inline Add value, Edit value and Remove value icons. See Build system variables.
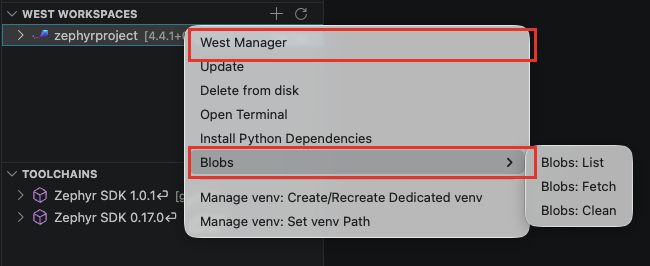
Right-click on the workspace:
- West Manager: edit the Zephyr revision and the module list of the workspace manifest. See West Manager.
- Update: run
west updateon the workspace. - Delete from disk: delete the workspace folder (irreversible).
- Install Python Dependencies: install the Python packages required by the workspace modules.
- Blobs submenu (Zephyr 3.2 and newer): Blobs: List, Blobs: Fetch and Blobs: Clean to manage vendor binary blobs.
- Manage venv: Create/Recreate Dedicated venv and Manage venv: Set venv Path: give the workspace its own Python environment. Manage venv: Remove Dedicated venv appears once it has one. See Python environments.
- Open Terminal: open a terminal with the workspace environment loaded.
Toolchains
Lists every toolchain registered in Workbench for Zephyr: Zephyr SDKs, IAR ARM, ARM GNU and Rust toolchains. The view title bar has an Add Toolchain (+) button and a Refresh button. See Toolchains for installation.
- Zephyr SDK entries show the SDK version. SDKs discovered in standard global locations carry a [global] badge.
- Zephyr SDK v1.0 and newer expand into GNU and LLVM groups listing the installed toolchains. The action rows Add GNU toolchain... and Install LLVM toolchain... install more components into the SDK. Right-click on any SDK > Add Toolchain to SDK... does the same, including on older SDKs that do not show these groups.
- IAR entries expand to show their associated Zephyr SDK.
- ARM GNU entries appear as single rows, one per registered Arm GNU toolchain.
- Rust entries expand to show the linked C toolchain. Right-click to Change Linked C Toolchain or Change Linked LLVM.
Removing a toolchain works in two ways:
- Remove Toolchain (or Remove IAR Toolchain, Remove ARM GNU Toolchain, Remove Rust Toolchain): unregister it from Workbench for Zephyr without touching the files.
- Delete from disk (or Delete IAR Toolchain, Delete ARM GNU Toolchain, Delete Rust Toolchain): delete the toolchain folder from your system (irreversible).

Entries whose folder no longer exists on disk are silently removed from the list when the view refreshes.
Host tools
Hub view for the tools installed on your machine:
- Host Tools Manager: verify, reinstall or extend the host tools (CMake, Ninja, Python, ...). The row reads Host Tools Manager ⚠️ Needs update when the installed tools are older than the version required by the extension. See Host Tools Manager.
- Install Runners: install the flash and debug runners (OpenOCD, J-Link, pyOCD, ...). See Install Runners.
Before the host tools are installed, the view shows an Install Host Tools link and an Advanced installation link instead. See Installation.
Other resources
Links that open in your web browser:
- Zephyr Training Partners: the Zephyr Project training partner program.
- Tutorials: the Zephyr Workbench website.
- Zephyr Documentation: the official Zephyr documentation.
- Awesome Zephyr: a curated list of Zephyr resources.
Status bar
Items appear on the left side of the status bar when the file in the active editor belongs to a Zephyr application:
- Application picker: shown when the file lives in a west workspace that declares applications. It displays the selected application name (or Select application…). Click it to pick another application of the workspace.
- Build: build the application (gear icon).
- Debug: debug the application.
- DT Manager: shown only while a devicetree file (
.overlay,.dts,.dtsi) is open. It opens the Devicetree Manager for the application.
On the right side, the MCP item shows the state of the AI agent server and opens the AI Manager. It reads MCP: answer needed while an agent waits for your answer in a dialog.
Zephyr Dashboard panel
The bottom panel area (next to Terminal and Output) gains a Zephyr Dashboard tab hosting the Workbench Dashboard: build summary, memory plots and Kconfig data for the selected application. Open it from the panel tab, or right-click on the application > Analysis > Workbench Dashboard. See Workbench Dashboard.
Explorer context menu
In the standard VS Code Explorer, right-click on any file or folder inside an application to reach:
- Zephyr Workbench: Build
- Zephyr Workbench: Debug
- Zephyr Workbench: Pristine Build/Rebuild
- Zephyr Workbench: Open Terminal
Each entry acts on the application that contains the selected file.
Zephyr BuildSystem Terminal
The extension contributes a terminal profile named Zephyr BuildSystem Terminal. Pick it from the dropdown next to the + button of the terminal panel to open a shell with the Zephyr environment (west, Python environment, toolchain variables) already loaded.