Applications
Applications are created and imported through a single wizard: Add Application. The same form handles both cases, a radio button switches between them.
To open the wizard, use one of:
- The "Add Application" item in the "Workbench for Zephyr" shortcuts view
- The [+] button on the "Applications" view title bar
- The command palette: "Zephyr Workbench: Add Application"
At least one west workspace is required. If none exists yet, create one first (see West Workspace). No toolchain is required to open the wizard: the toolchain list offers "Add new toolchain..." to install one on the fly.
Common fields
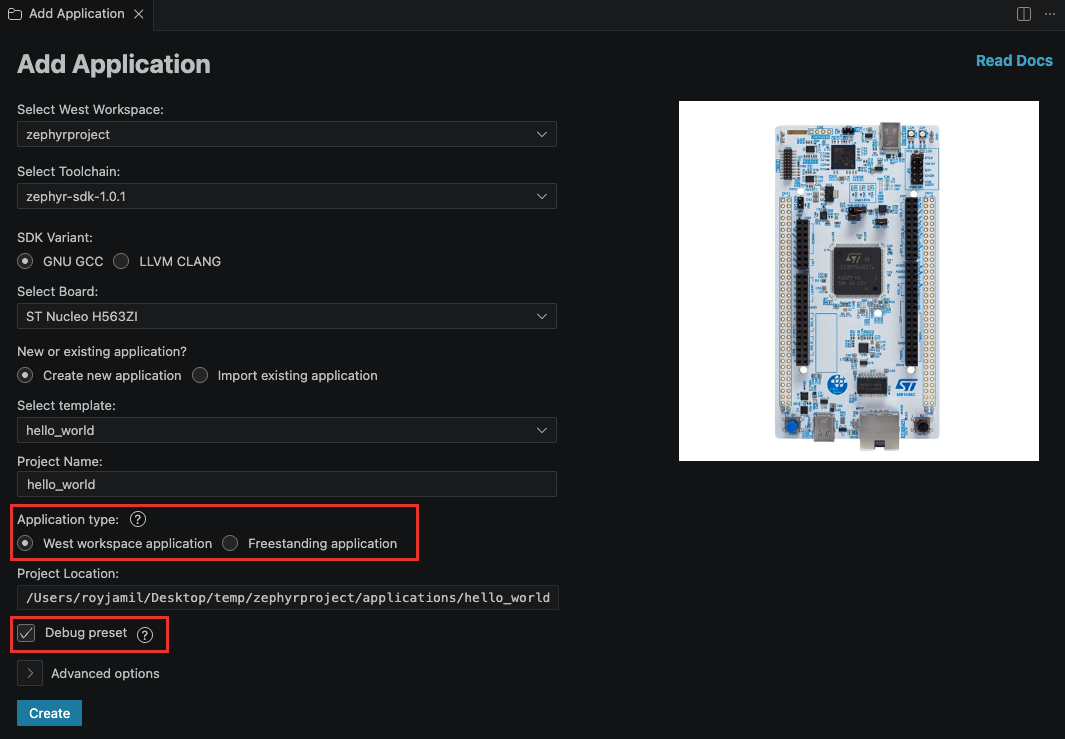
- Select West Workspace: pick the parent west workspace. The workspace is scanned to detect the available boards and samples.
- Select Toolchain: pick a toolchain. The list contains the auto-detected Global Zephyr SDK (if any), your registered Zephyr SDKs, IAR, ARM GNU and Rust toolchains, and a last entry "Add new toolchain..." that opens the Add Toolchain wizard. A status line below the list warns when the selected SDK does not match the workspace's Zephyr version.
- SDK Variant (shown only when the selected SDK includes LLVM): "GNU GCC" (default) or "LLVM CLANG".
- Select Board: pick the target board. If your board is not listed, choose "Enter custom board..." and type its identifier in the "Custom board" field (format:
board[@revision][/soc[/cluster][/variant]]). - New or existing application?: "Create new application" (default) or "Import existing application".
Create a new application
With "Create new application" selected, fill in:
- Select template: the sample or test that serves as base for your project. The list is grouped into "SAMPLES" and "TESTS" (plus "RUST SAMPLES" when the workspace has the Rust module).
- Project Name: the name of your application.
- Application type:
- "West workspace application": the application lives inside the selected west workspace (under the applications subfolder).
- "Freestanding application": the application lives anywhere on disk; pick its location with "Browse...".
- Project Location: computed automatically for a west workspace application; a folder picker for a freestanding one.
- Debug preset (checked by default): adds debug-friendly options to
prj.conf:CONFIG_DEBUG_OPTIMIZATIONS,CONFIG_DEBUG_THREAD_INFO,CONFIG_STACK_USAGE,CONFIG_BUILD_OUTPUT_HEX,CONFIG_BUILD_OUTPUT_META,CONFIG_OUTPUT_SYMBOLS,CONFIG_OUTPUT_STAT,CONFIG_OUTPUT_DISASSEMBLY,CONFIG_OUTPUT_PRINT_MEMORY_USAGE. Uncheck it for a release-like configuration. - Advanced options (collapsible):
- "Create a dedicated Python venv for this application": creates a
.venvused only by this application instead of the workspace or global environment. - Settings paths: "relative" (default) stores generated paths with
${workspaceFolder}, "absolute" stores full paths. - IntelliSense provider: "C/C++ extension" or "clangd".
- Applications subfolder: where the application is created under the west workspace (default
applications, empty for the workspace root).
- "Create a dedicated Python venv for this application": creates a
- Click "Create".
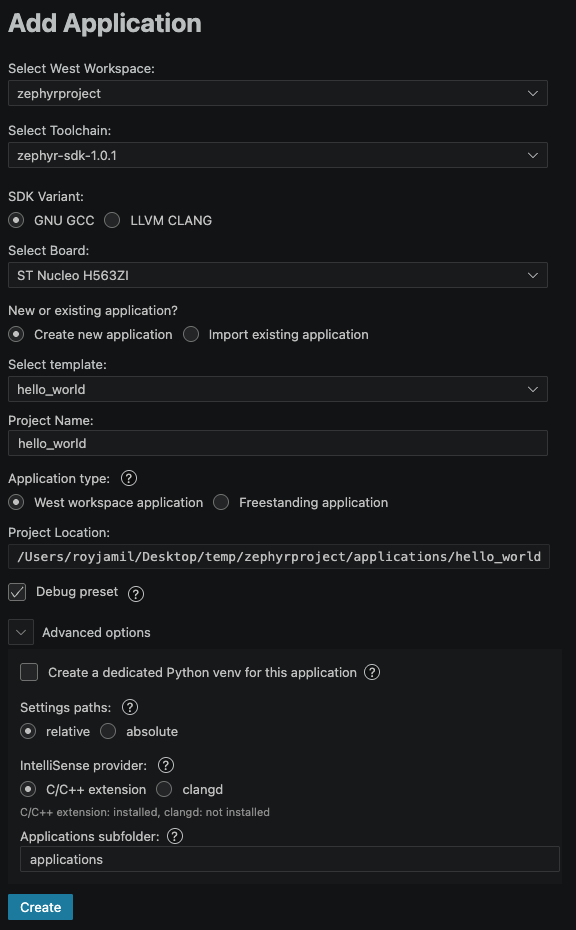
The new application appears in the "Applications" view and its folder is added to your VS Code workspace.
West workspace or freestanding?
Both application types build the same way; the difference is where the project lives and how it travels:
- A West workspace application is created inside the west workspace folder (under the applications subfolder,
applicationsby default). It moves with the workspace, is visible to west, and is the natural choice when the workspace is dedicated to your project or team. - A Freestanding application lives in any folder outside the workspace and only references it for building. Choose it to keep your code in its own repository, reuse one shared workspace across many projects, or import sources that already live elsewhere.
When in doubt, keep the default "West workspace application". You can later attach the application to another workspace with Change West Workspace.
Import an existing application
If you already have application sources, select "Import existing application" in the same wizard.
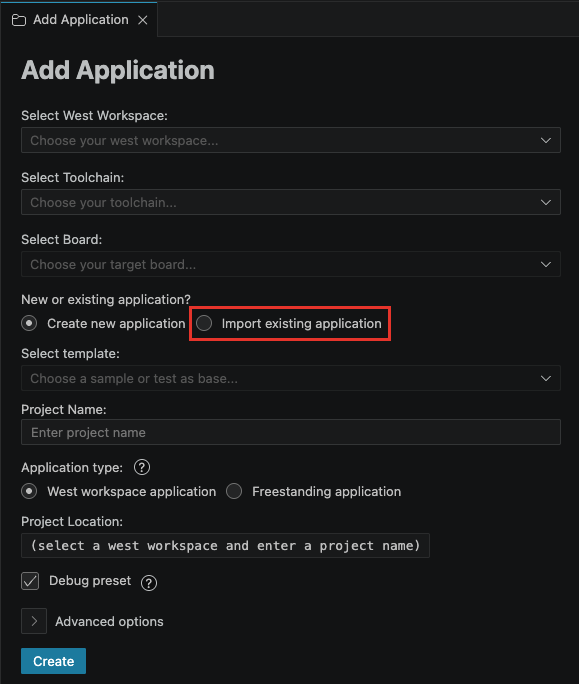
- Select the west workspace, toolchain and board as usual.
- In "Project Location", click "Browse..." and select the application folder.
- Click "Create".
The folder must be a Zephyr application: it needs at least a prj*.conf Kconfig fragment (for example prj.conf or prj_release.conf) and a CMakeLists.txt that calls find_package(Zephyr) at its root. Otherwise the import is rejected with an explanatory message.
If the application was already configured by Workbench for Zephyr, leave the workspace, toolchain and board all unselected: the import then reuses the project's existing configuration.
Build, flash and debug no longer use tasks.json. Applications created with older versions still carry a generated .vscode/tasks.json that can conflict with the current extension. Delete the .vscode/tasks.json file from those applications, or re-import them with the wizard.
Application structure
The application consists at least of:
application
├── src               // Source directory
├── CMakeLists.txt    // Link the application to the Zephyr's CMake build system
├── prj.conf          // KConfig fragment
└── build             // Build directory (generated)
Other optional files and overlays can be added. For more information, refer to the Zephyr Application Development documentation.
Build the application
From the "Applications" view:
- Right-click on the application > Build
- Or click the build (gear) button next to the application
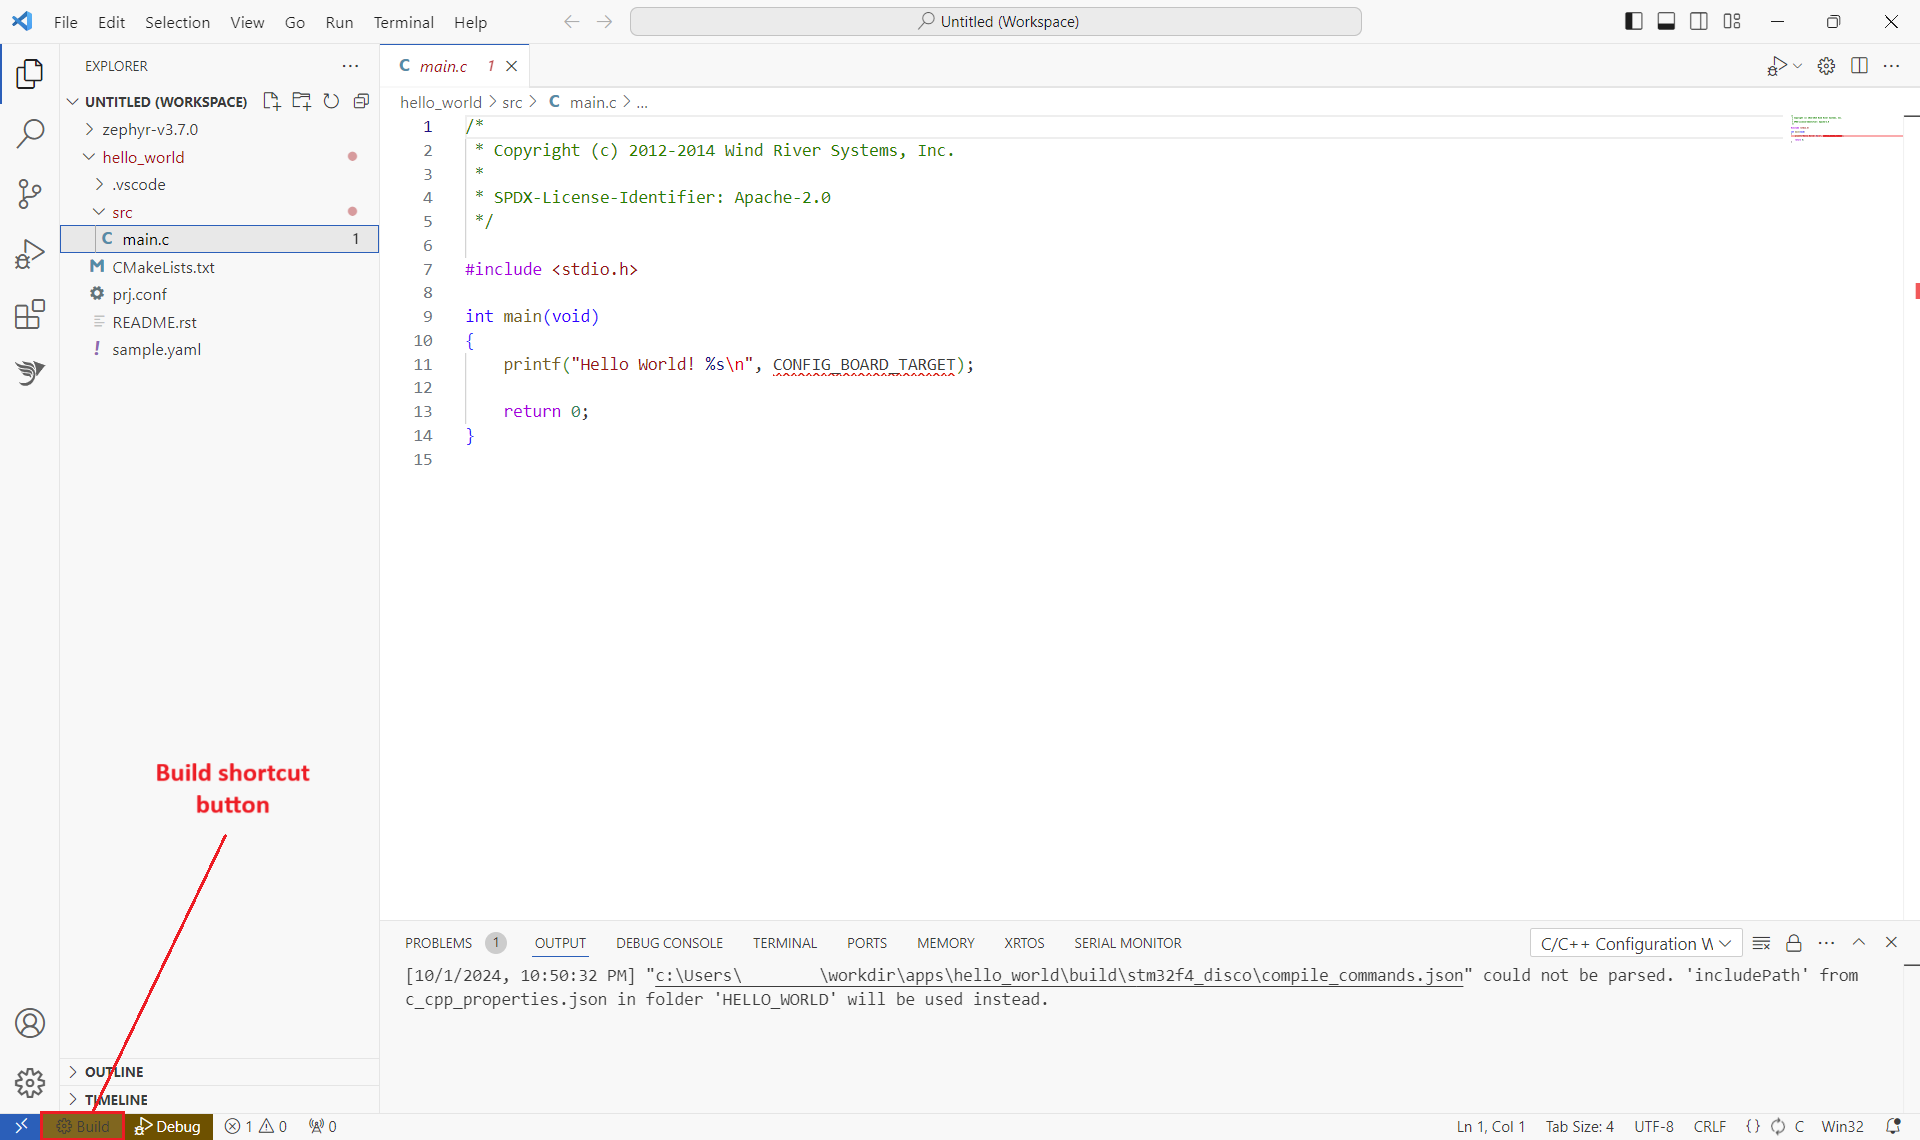
When a source file of your application is open in the editor, shortcut buttons also appear in the status bar (see Status bar).
Manage applications
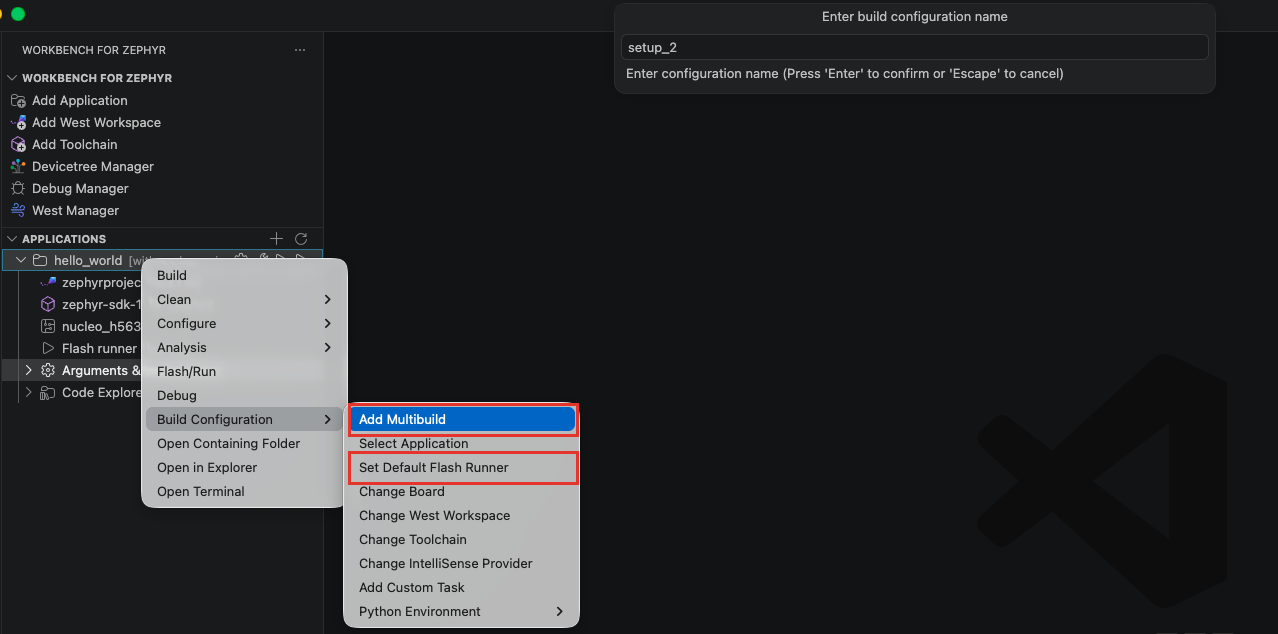
Every application appears in the "Applications" view. Right-click on the application to access:
- Build
- Clean
- Rebuild/Pristine: fully clean the build folder then rebuild.
- Delete Build: delete the
builddirectory. - Delete from disk: delete the application folder from the system (irreversible).
- Remove: remove the application from the view without deleting files.
- Configure
- Kconfig Manager: configure the Zephyr kernel in a dedicated panel.
- Gui Config: open guiconfig in a new window.
- Menuconfig: open menuconfig in a terminal.
- Harden config: run the configuration hardening tool.
- Sysbuild > Enable / Disable.
- Analysis
- Workbench Dashboard: overview of the application, workspace status and build information.
- West Dashboard: west workspace repositories, manifest and modules.
- Memory Analysis: RAM Report, ROM Report, RAM Plot, ROM Plot, Puncover.
- Static Code Analysis: ECLAIR Manager, DT Doctor.
- SPDX: build and analyze SPDX Software Bills of Materials.
- Flash/Run: flash the firmware to the board (see Flash and Run).
- Debug: start or reuse a debug session (see Debug Session).
- Build Configuration
- Add Multibuild: add a build configuration for another board (see Multibuild).
- Select Application: set this application as the active one for its workspace.
- Set Default Flash Runner: pick the runner used for flash and debug (see Flash and Run).
- Change Board (see Change Board).
- Change West Workspace (see Change West Workspace).
- Change Toolchain (see Change Toolchain).
- Change IntelliSense Provider: switch between the C/C++ extension and clangd.
- Add Custom Task (see Add a custom task).
- Python Environment: Create local Python Virtual Environment, Set local Python Virtual Environment, Set global Python Virtual Environment (see Python Environments).
- Open Containing Folder: open the application folder in your file explorer.
- Open in Explorer: open the folder in the VS Code "Explorer" view.
- Open Terminal: open a Zephyr Workbench terminal for the application. It already has the workspace environment and all the environment variables loaded, and it opens in the build directory (or the application folder if it has not been built yet), so you can run
westcommands directly.
Arguments and environment
Expand the application (or one of its build configurations) and open the "Arguments & Environment" group to tune the build:
- west Arguments: extra arguments appended to the
west buildcommand. For example, add--sysbuildto enable Sysbuild. - west Flags -D: extra CMake definitions, each value is passed as
-D<flag>. - EXTRA:
- EXTRA_CONF_FILE: additional Kconfig fragment files.
- EXTRA_DTC_OVERLAY_FILE: additional devicetree overlay files.
- EXTRA_ZEPHYR_MODULES: absolute paths to additional modules.
- SHIELD: select from the available shields.
- SNIPPETS: snippets to apply to the build.
To edit the "west Arguments" row, use its inline pencil icon. On the other rows, use the inline [+] icon to add a value, and the pencil and remove icons on a value to edit or delete it.
Code Explorer
Each application ends with a "Code Explorer" node: a file tree of the application sources (the build and .git folders are hidden). Click a file to open it in the editor; the file currently open in the editor is highlighted automatically.
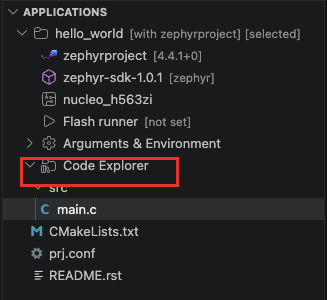
Right-click entries for file operations:
- On a file: Open to the Side, Rename..., Delete, Reveal in Explorer View, Copy Path, Copy Relative Path.
- On a folder: New File..., New Folder..., Rename..., Delete, Open in Integrated Terminal, Reveal in Explorer View, Copy Path, Copy Relative Path.
- On the "Code Explorer" node itself: New File..., New Folder..., Open in Integrated Terminal, Reveal in Explorer View.
"Open in Integrated Terminal" opens the application's Zephyr terminal (same environment as "Open Terminal" on the application), not a plain shell.
Add a custom task
To add your own task to an application, right-click on the application > Build Configuration > Add Custom Task, then enter:
- The task label (for example "West Size").
- The command (for example
west). - Optional arguments (for example
build -t rom_report). - An optional build configuration context, or "No build configuration" to run with the application-level environment only.
The task is written to the application's tasks.json and can be run like any VS Code task. Use the "Open tasks.json" button in the confirmation message to review or edit it.
Status bar
When the active editor file belongs to an application, shortcut items appear in the status bar:
- Application picker: shows the selected application of the west workspace. Click it to switch when the workspace contains several applications (same effect as "Select Application" in the tree).
- Build: builds the application.
- Debug: starts a debug session for the application.
A "DT Manager" item also appears when a devicetree file (.overlay, .dts, .dtsi) is active; it opens the Devicetree Manager for the application (see Devicetree Manager).