West Manager
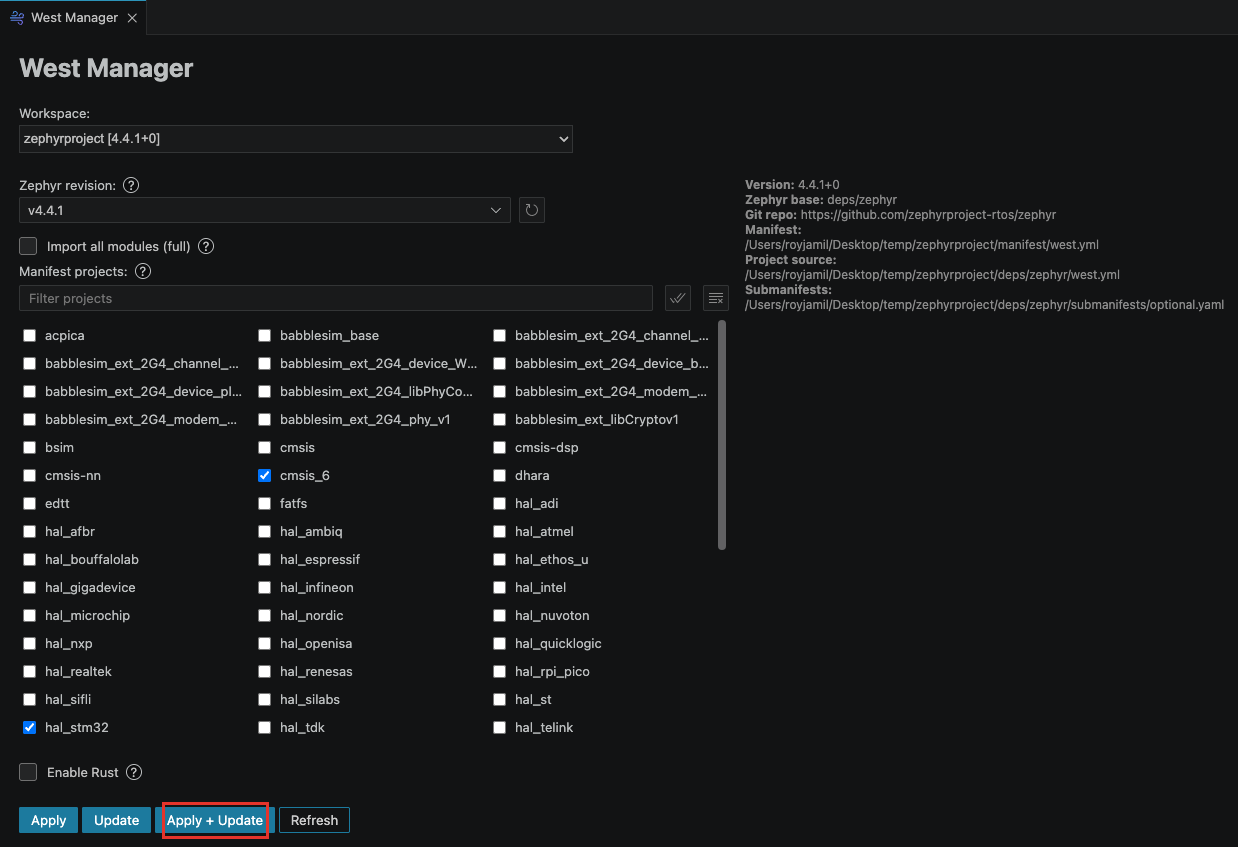
The West Manager lets you edit a west workspace's manifest (west.yml) without leaving VS Code. Use it to change the Zephyr revision, choose which modules the workspace imports, and update the workspace so the changes take effect on disk.
Open the West Manager
Open it in one of three ways:
- Click West Manager in the "Workbench for Zephyr" shortcuts view.
- Right-click on the workspace in the West workspaces view > West Manager.
- Run Zephyr Workbench: West Manager from the Command Palette.
The West Manager needs at least one west workspace open in VS Code. See West Workspace to create or import one.
Choose the workspace and revision
- Select the workspace to manage in the Workspace: dropdown. When you open the West Manager from a workspace's context menu, that workspace is preselected.
- Set the Zephyr version in the Zephyr revision: field. Type a tag or branch name, or pick one from the dropdown (suggestions are grouped under TAGS and BRANCHES, loaded from the Zephyr git repository). Click the Refresh revisions button to reload the list.
Select the modules
The panel offers two ways to control which modules the workspace imports:
- Import all modules (full): check this box for a full workspace where the zephyr project imports every module. The project list is disabled while it is checked.
- Manifest projects: uncheck Import all modules (full) to manage a specific set of modules instead. Check the projects you want in the workspace: only the checked ones are written to the manifest allowlist and fetched on update.
The project list toolbar helps with large manifests:
- Filter projects: type to narrow the list (for example
hal_to see only HAL modules). - Select all projects: check every listed project.
- Clear projects: uncheck every listed project.
A minimal allowlist keeps the workspace small and updates fast. Start from your vendor's HAL plus the base modules, and add more projects later as your application needs them.
Enable Rust
Check Enable Rust to add the optional zephyr-lang-rust module to the workspace. Clicking Apply activates the module and keeps it in the manifest projects allowlist. Run Update afterwards to fetch it into modules/lang/rust.
Workspace details
The side panel shows read-only information about the selected workspace:
- Version: the Zephyr version of the workspace.
- Zephyr base: path to the
zephyrfolder. - Git repo: URL of the Zephyr repository used by the manifest.
- Manifest: path to the
west.ymlbeing managed. - Project source: where the zephyr project sources live in the workspace.
- Submanifests: additional manifest fragments found under
zephyr/submanifests, when present.
Apply, Update, Apply + Update, Refresh
- Apply: writes your changes (revision, module selection, Rust option) to the workspace's
west.yml. The file is edited in place: comments, ordering, and unrelated entries are preserved. Nothing is downloaded yet. - Update: runs
west updateon the workspace to fetch or update the module repositories, then reloads the board list. A progress notification tracks the operation and lets you cancel it. - Apply + Update: saves the manifest, then updates the workspace, in one click. Use this for the common case of changing the selection and syncing right away.
- Refresh: reloads the panel from the workspace on disk. Use it after editing
west.ymlby hand.
If you click Apply without updating, the manifest and the workspace content no longer match. Run Update (or right-click on the workspace > Update) to bring the repositories in sync.
Unsupported manifest topologies
The West Manager can manage a workspace whose zephyr project imports modules via import: true or an import.name-allowlist (this covers workspaces created with the Add West Workspace wizard). If the manifest uses a different topology, the panel reports "This manifest topology is not supported" and does not rewrite the file. You can still edit such a west.yml by hand.