Getting started with Cursor
Workbench for Zephyr also runs in Cursor, the AI code editor built on VS Code. This tutorial covers what is specific to Cursor: getting to the editor window, installing the extension from the Cursor marketplace, opening the Workbench for Zephyr view, and replacing the companion extensions that Cursor does not provide. It then walks through the first setup (host tools, Zephyr SDK, west workspace) and builds a first application. After that, the steps are the same as in VS Code, except for reading the serial output (see Companion extensions in Cursor).
The screenshots were taken with Cursor 3.22 on macOS and Workbench for Zephyr 4.2.1. On Windows and Linux, use Ctrl instead of Cmd in the shortcuts.
What you will do
- Open the Cursor editor window.
- Install Workbench for Zephyr from the Cursor marketplace.
- Open the Workbench for Zephyr view.
- Install the host tools.
- Add the Zephyr SDK.
- Add a west workspace.
- Install the C/C++ extension for Cursor, or Cortex-Debug and clangd.
- Create a
hello_worldapplication. - Build it.
Before you start
- Cursor installed. On first launch, Cursor asks you to log in or sign up with a Cursor account.
- The requirements of your operating system, listed on the Installation page. On macOS, Homebrew must be installed.
- An internet connection: the host tools, the SDK and the Zephyr sources are downloaded during the setup.
Step 1: open the editor window
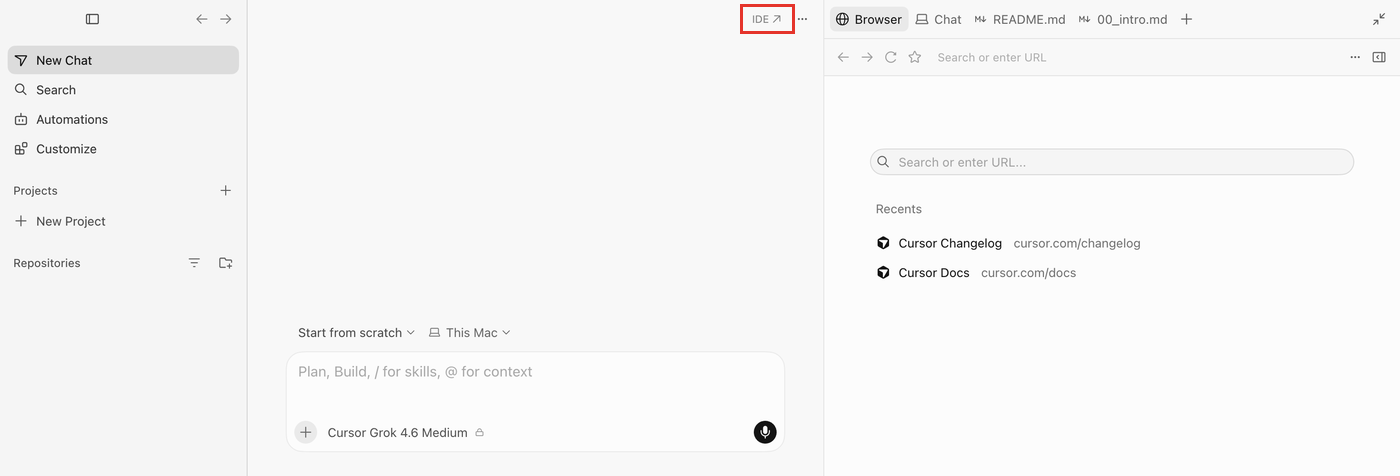
Cursor 3 opens in the Agents window. Extensions such as Workbench for Zephyr live in the classic editor window: click IDE at the top of the Agents window to open it.
Step 2: install Workbench for Zephyr
Cursor has its own extension marketplace.
- Open the Extensions view (Cmd+Shift+X).
- Search for
Ac6.zephyr-workbench. - Click on Workbench for Zephyr (publisher Ac6), then click Install.
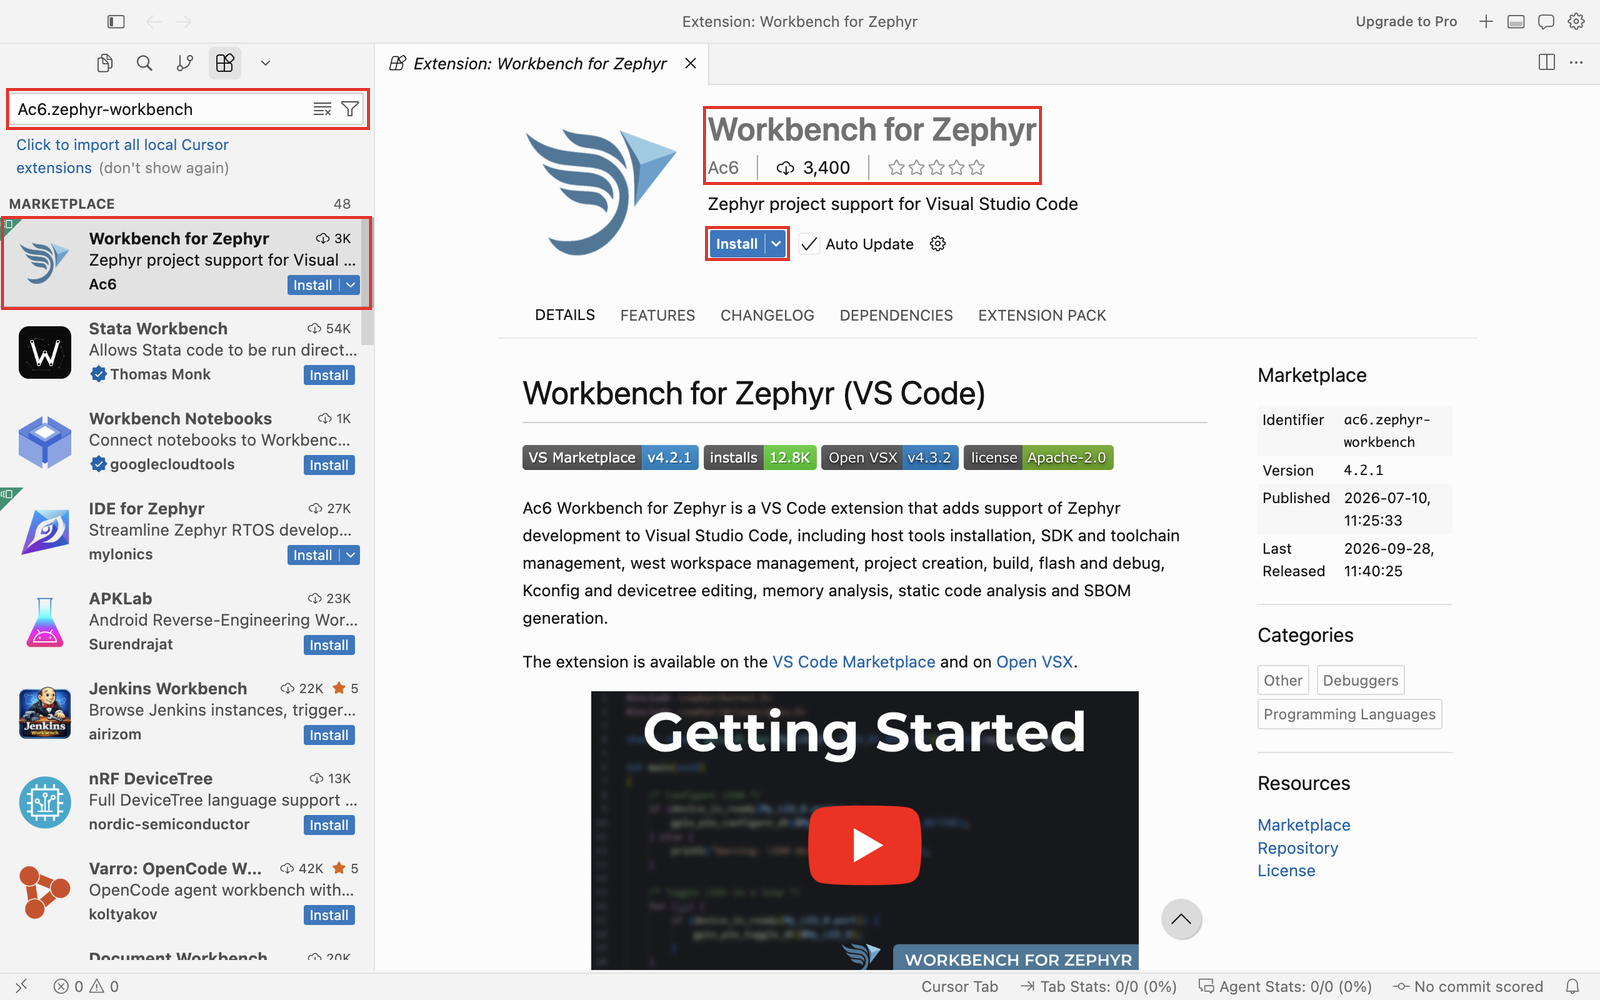
Search with the identifier Ac6.zephyr-workbench. A search for "Workbench for Zephyr" also works, but in Cursor the Ac6 extension is listed far down the results.
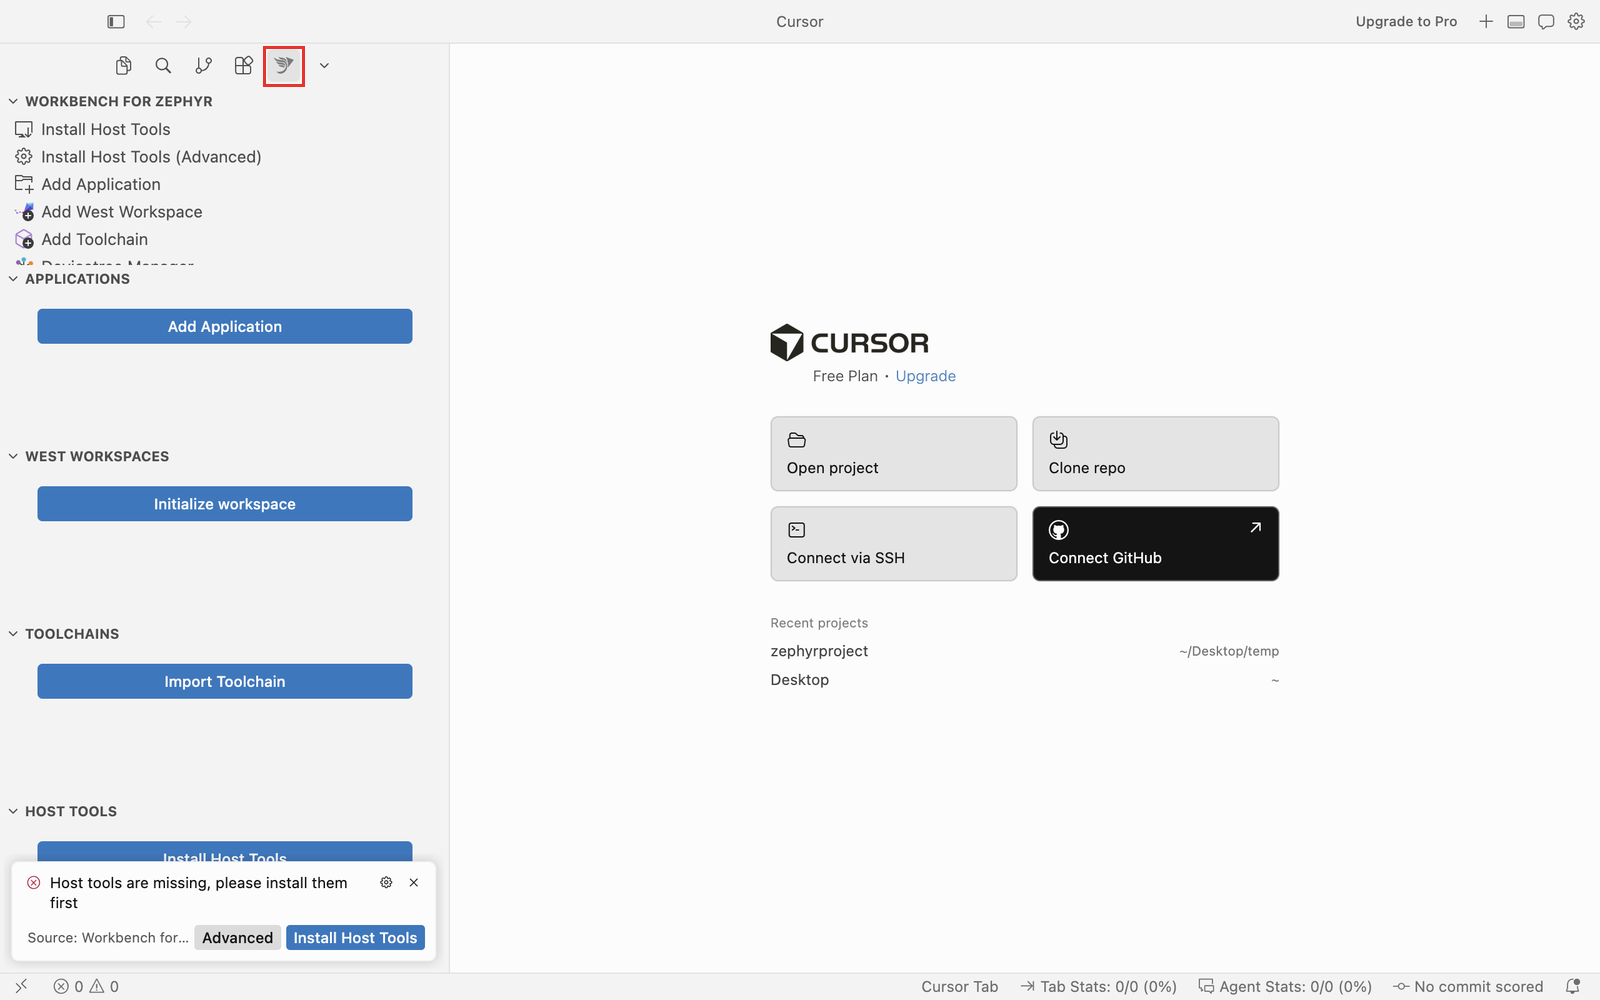
Once installed, Workbench for Zephyr shows a "Host tools are missing, please install them first" notification. You can click Install Host Tools in it, or follow Step 4.
Companion extensions in Cursor
Workbench for Zephyr installs its companion extensions automatically. In Cursor, two of them are not available in the marketplace and are skipped without an error message:
- C/C++ (Microsoft,
ms-vscode.cpptools): replace it with the C/C++ extension for Cursor, or with Cortex-Debug and clangd, see Step 7. - Serial Monitor (Microsoft): to read the serial output of your board, use a serial terminal or another serial monitor extension from the Cursor marketplace.
Devicetree Manager for Zephyr, Cortex-Debug, File Downloader and the DeviceTree Language Server install as in VS Code.
Step 3: open the Workbench for Zephyr view
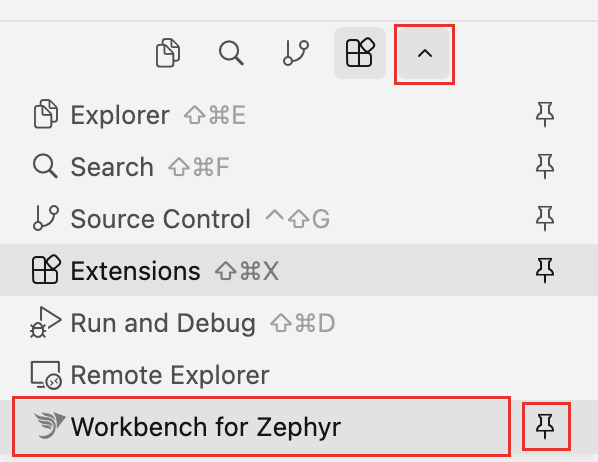
In Cursor, the activity bar is displayed as a row of icons at the top of the side bar, instead of on the left edge of the window. The Workbench for Zephyr icon is in its overflow menu:
- Click on the arrow at the end of the icon row.
- Hover over Workbench for Zephyr and click on its pin icon to keep it in the row.
- Click on Workbench for Zephyr to open the view.
The Workbench for Zephyr icon now stays in the side bar:
Step 4: install the host tools
- Click on Install Host Tools.
- The installation runs in the terminal, with a progress notification you can cancel.
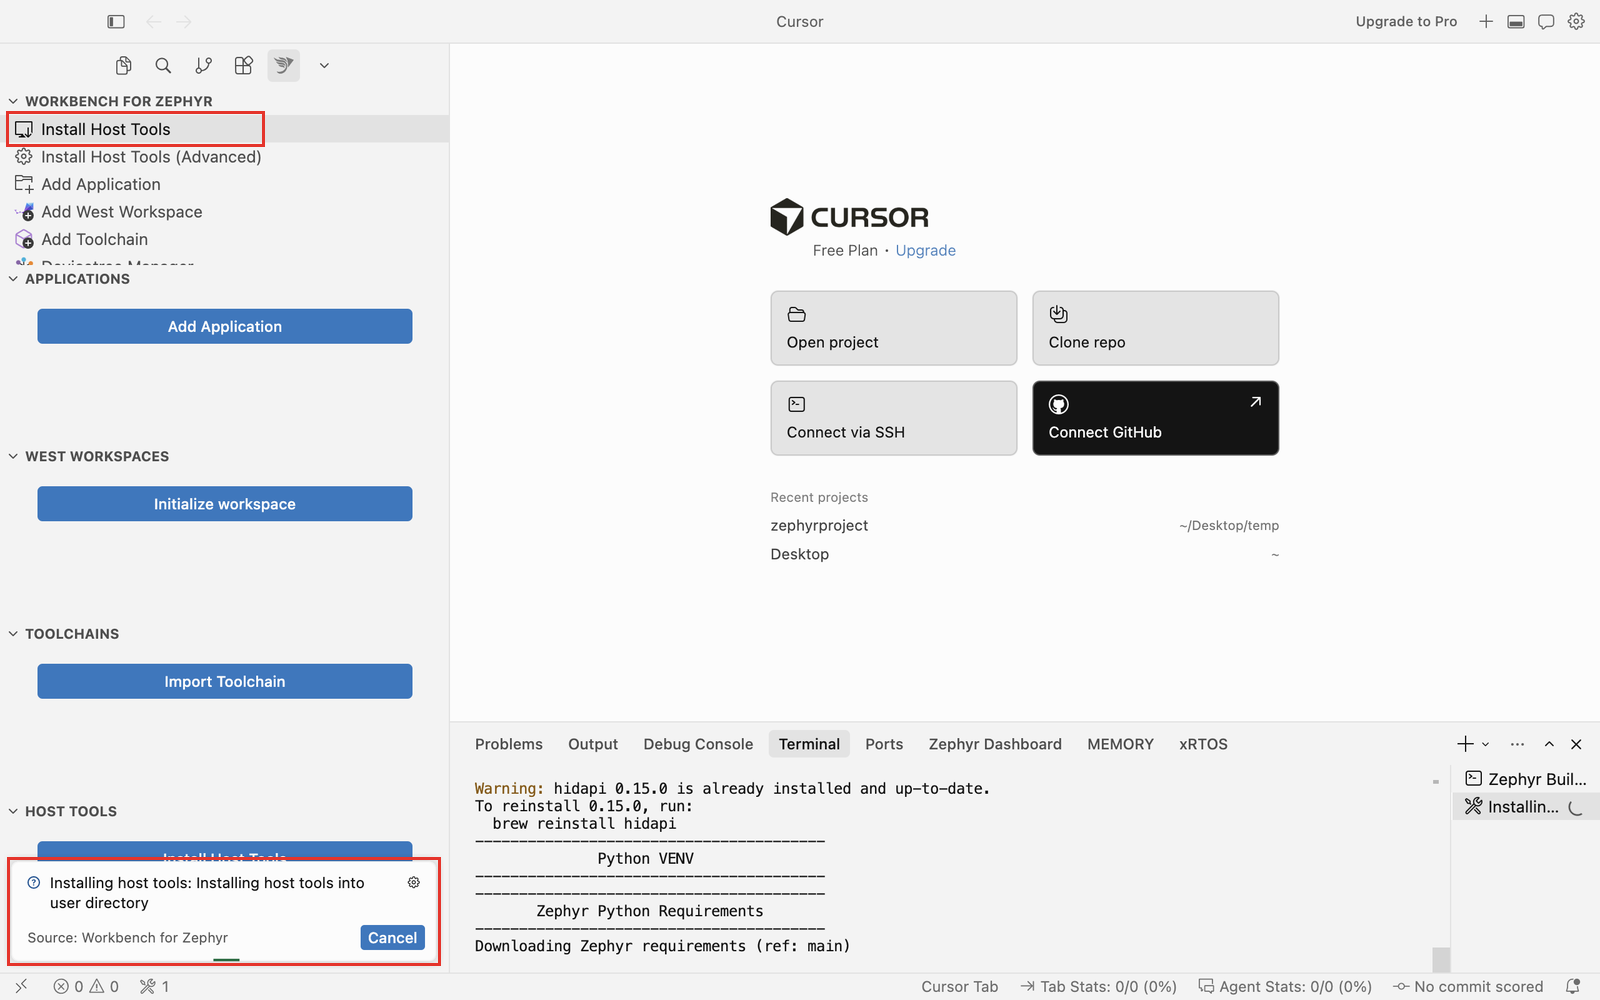
When it completes, two notifications confirm it: "Setup Zephyr environment successful" and "OpenOCD runner installation successful". The tools installed on each operating system are listed in Installation. To choose which tools to install, use Install Host Tools (Advanced) instead, see Advanced Host Tools.
Step 5: add the Zephyr SDK
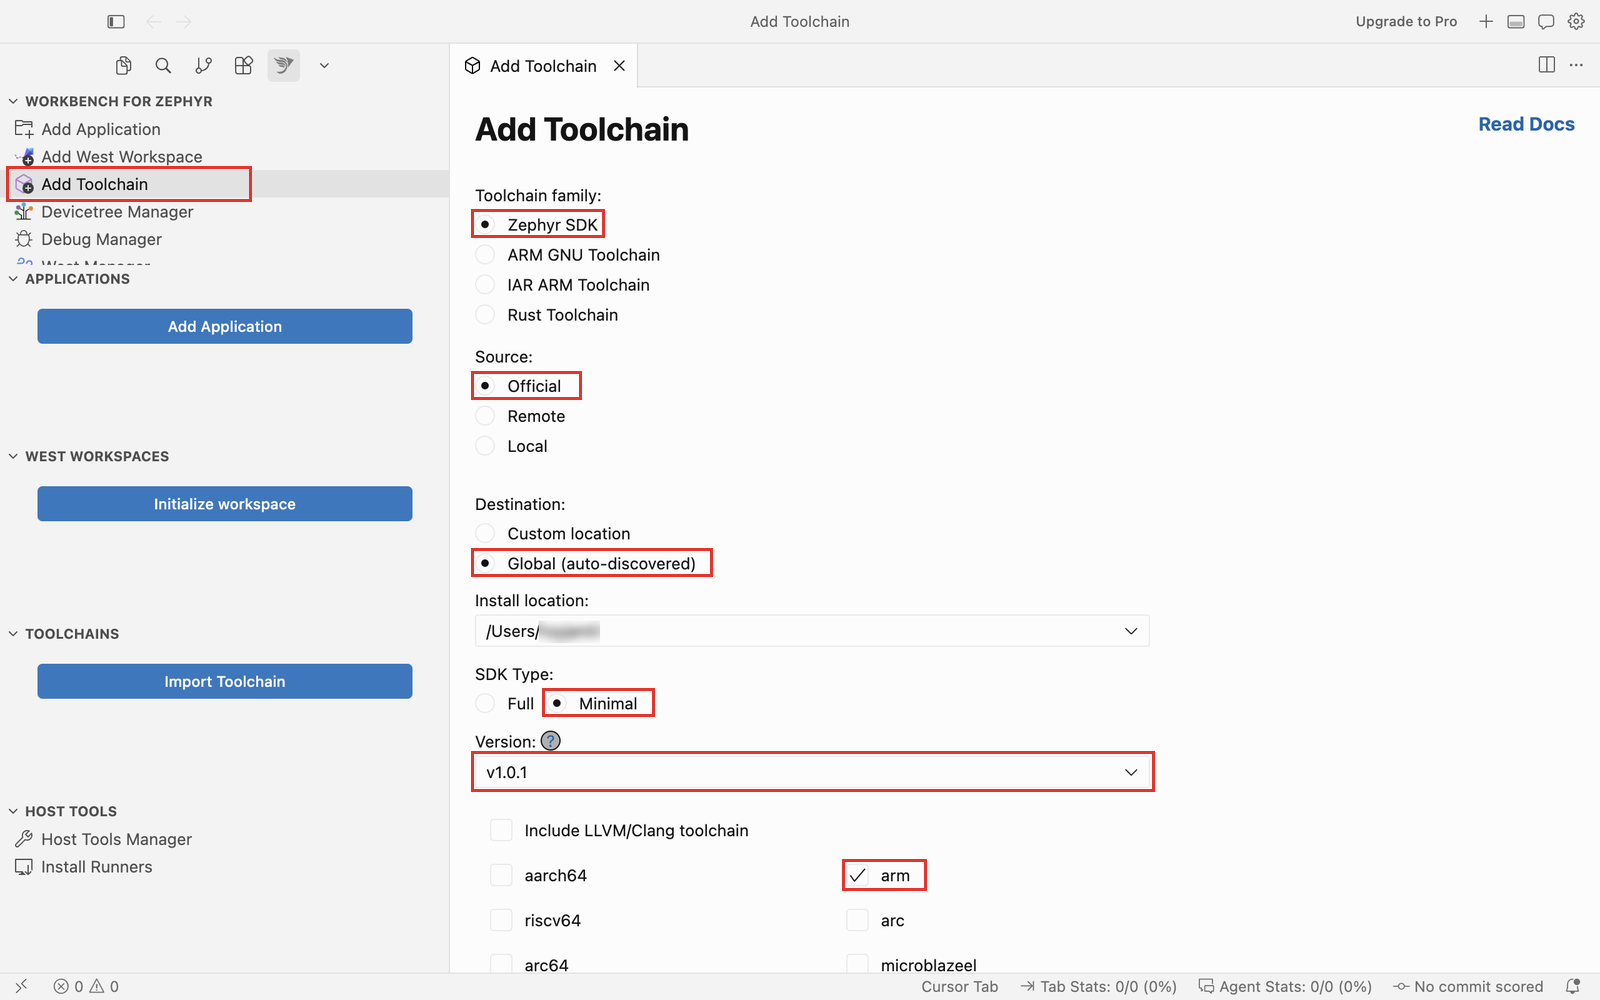
- Click on Add Toolchain.
- Keep Toolchain family set to "Zephyr SDK" and Source set to "Official".
- Destination: select "Global (auto-discovered)". The SDK is installed in your home folder (the Install location default) and the Zephyr build system finds it automatically.
- SDK Type: select "Minimal" to install only the toolchains you need, or keep "Full" to install all of them.
- Version: keep the latest release.
- With "Minimal", check the toolchains you need in the list below Version, for example arm for STM32 boards.
- Scroll down and click on Import.
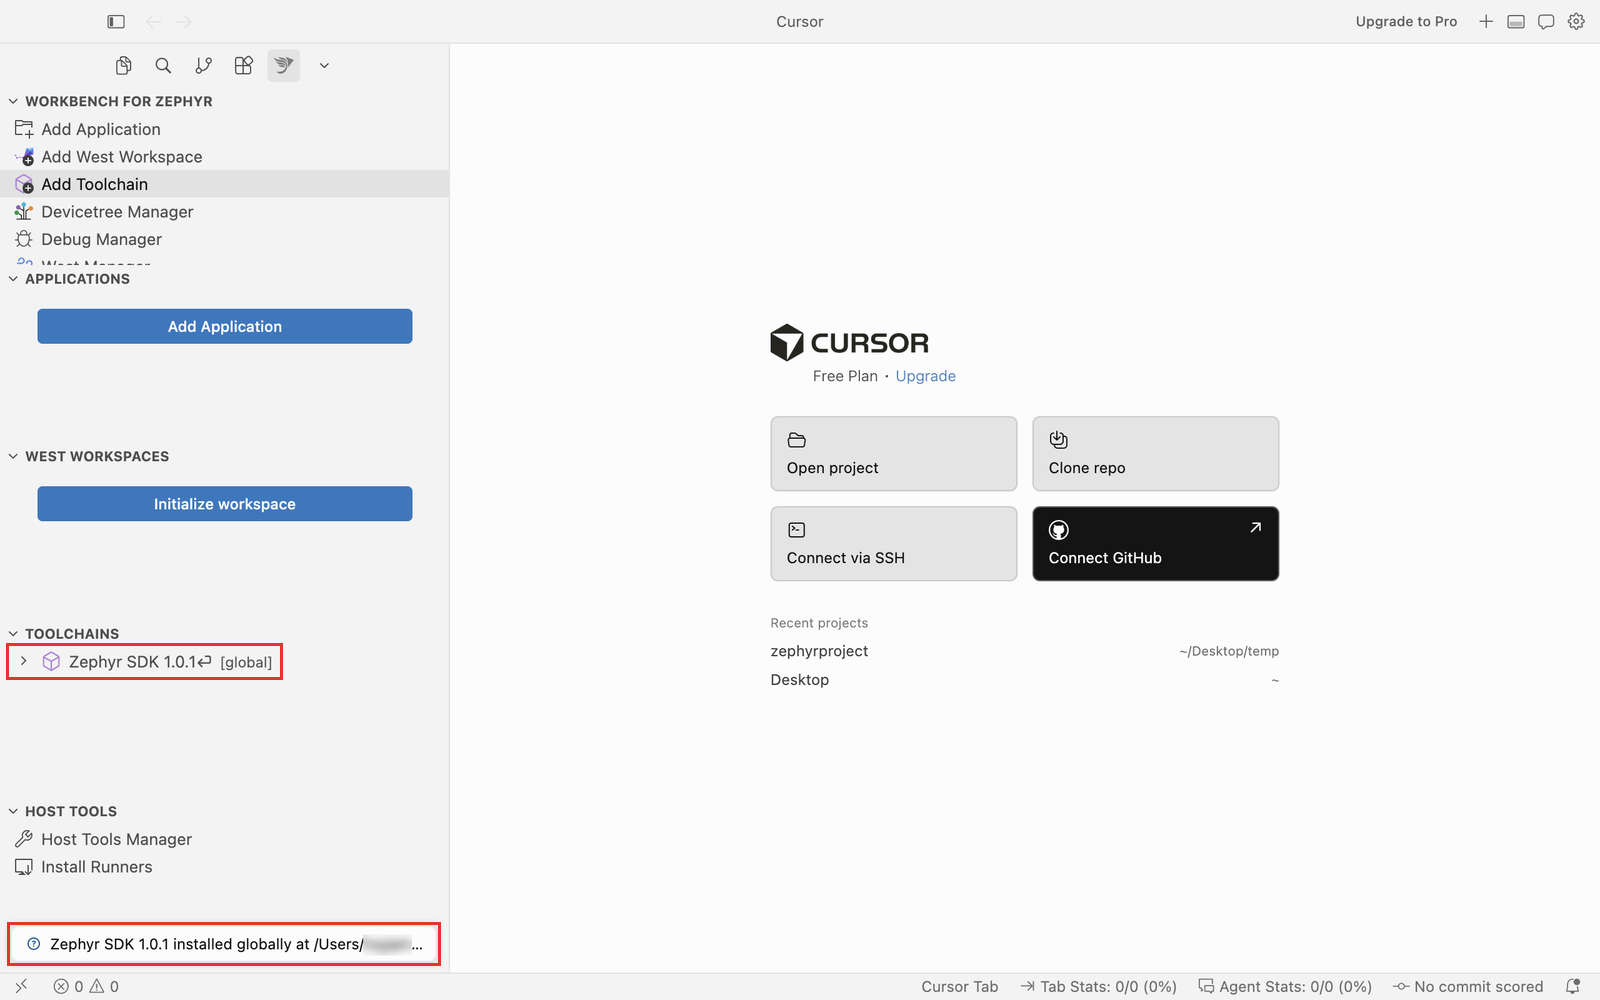
When the notification "Zephyr SDK ... installed globally" appears, the SDK is listed in the Toolchains view with a [global] badge.
The other sources and destinations are described in Toolchains.
Step 6: add a west workspace
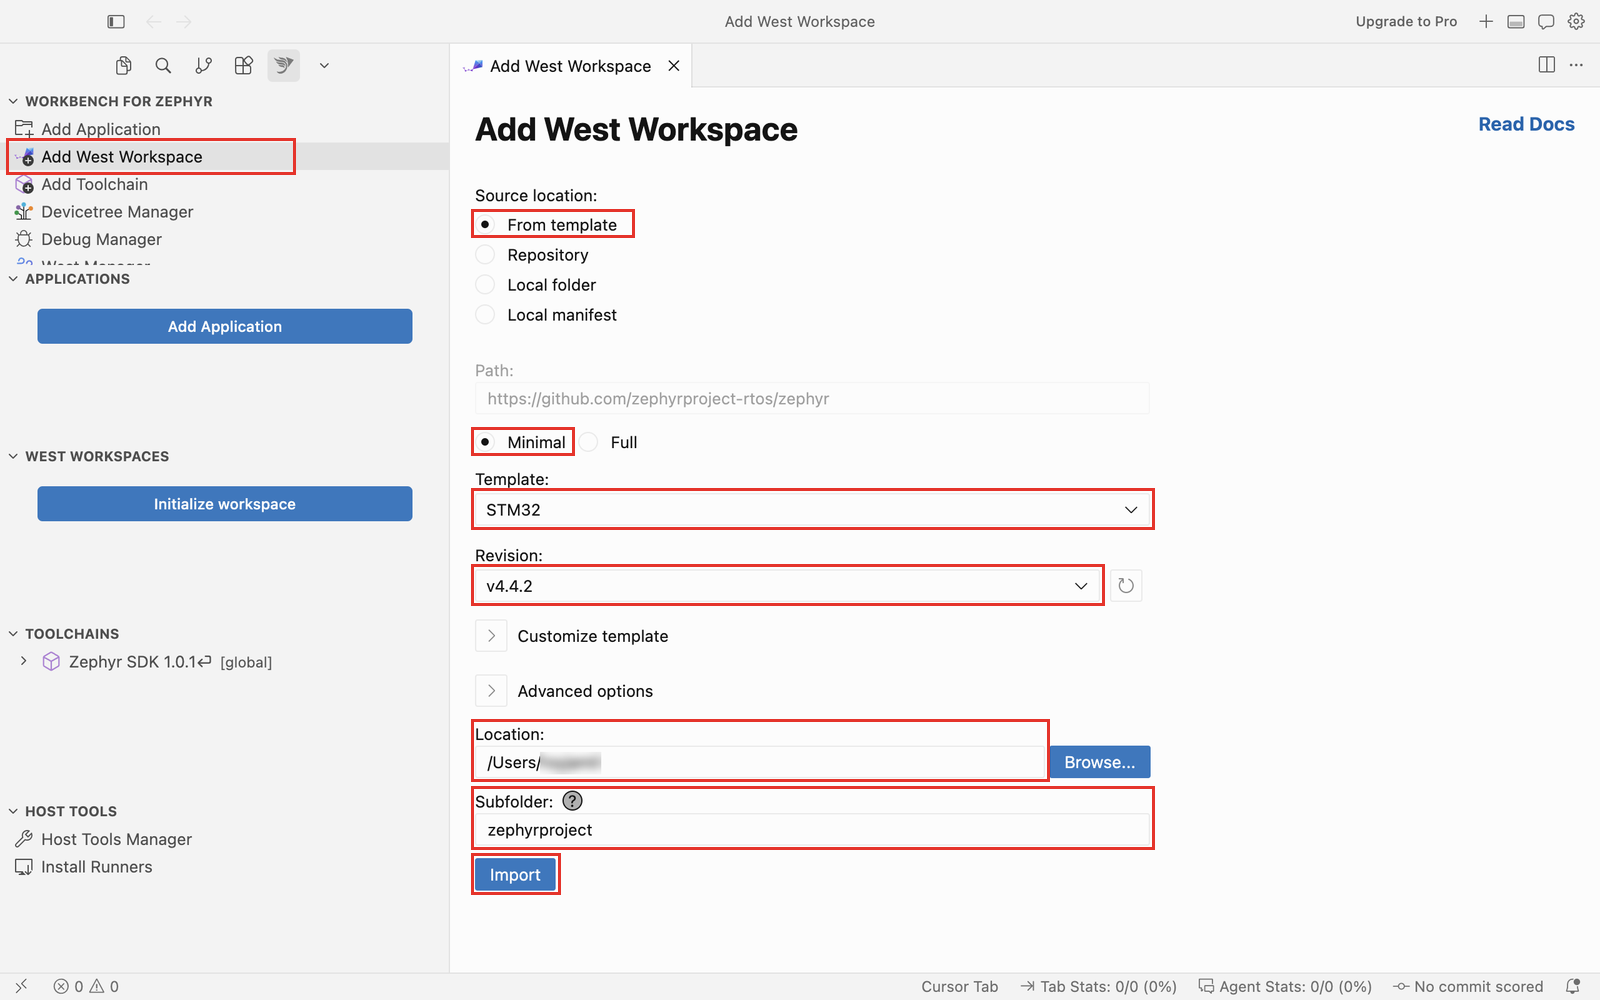
- Click on Add West Workspace.
- Keep Source location set to "From template" and keep "Minimal" selected.
- Template: pick the template of your board vendor, for example "STM32".
- Revision: keep the latest Zephyr tag.
- Location: enter or browse to the parent folder of the workspace.
- Subfolder: name of the workspace folder (default "zephyrproject").
- Click on Import.
The Zephyr sources and modules are downloaded; it takes several minutes. When it completes, the workspace is listed in the West workspaces view and its folder is added to the Cursor window. The task terminals on the right of the Terminal panel may show a yellow warning icon: it does not mean that the setup failed.
If the notification "Zephyr Workbench recommends applying CMake settings to prevent popup conflicts (e.g., sourceDirectory). Apply now?" appears, click Yes: it sets CMake Tools options for this workspace so that CMake Tools does not configure the folder on its own.
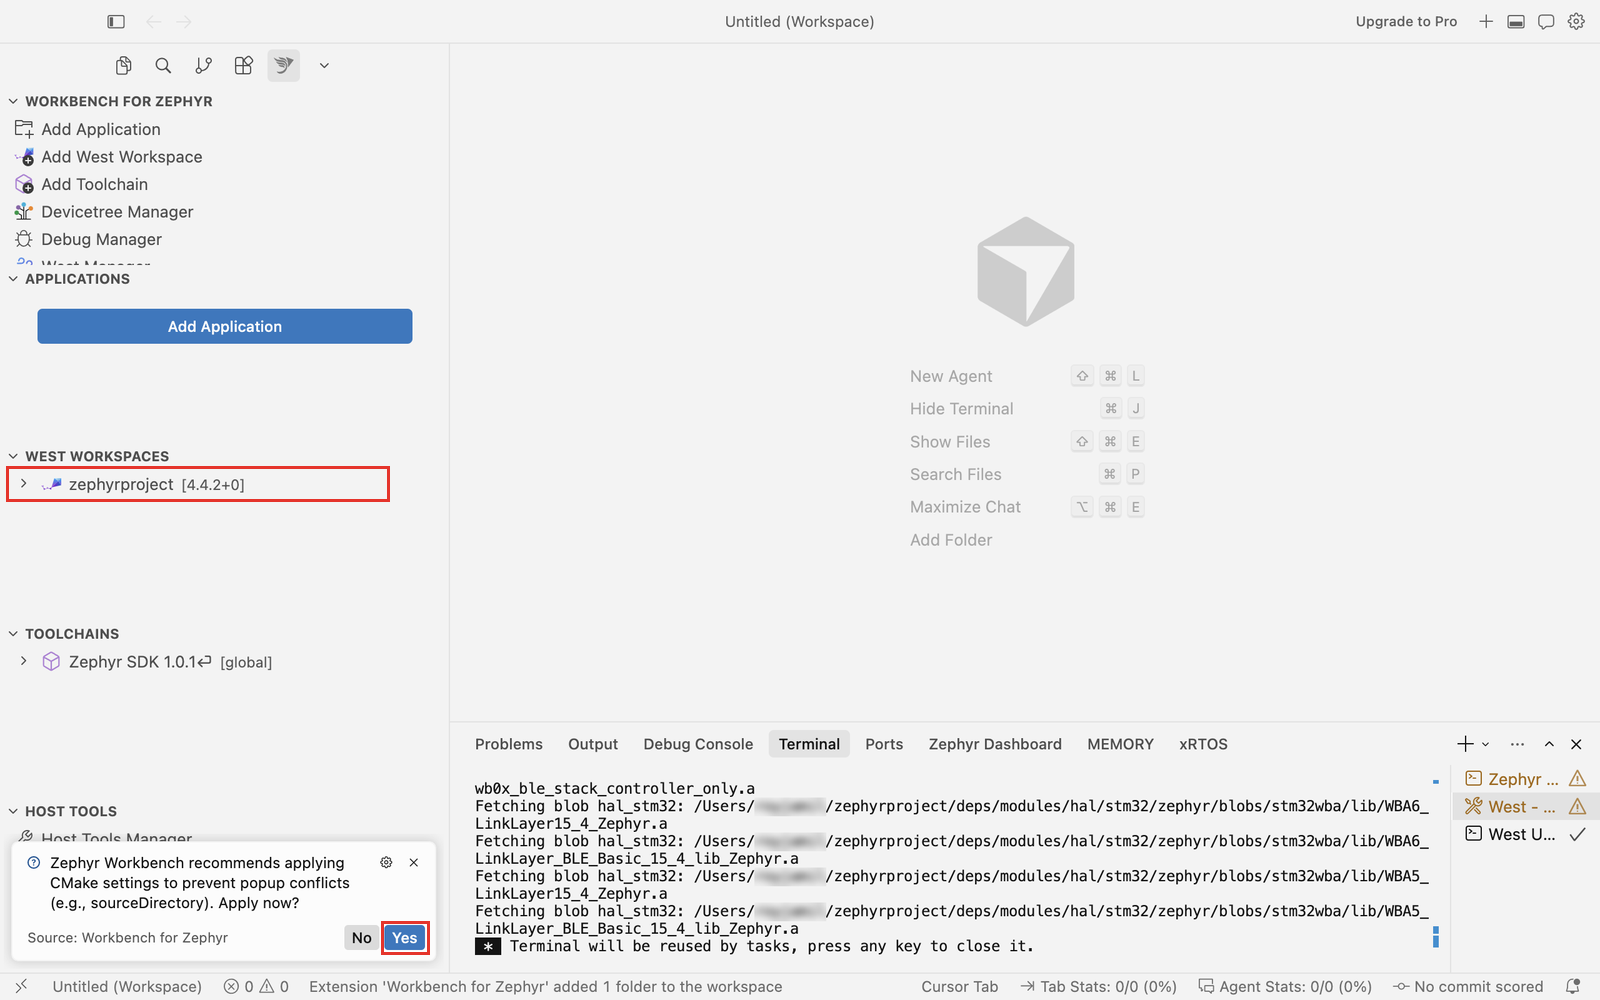
For all the options of this form, see West Workspace.
Step 7: install the C/C++ extension for Cursor
The default debug backend of Workbench for Zephyr, "C/C++ Debug (cppdbg)", needs the cppdbg debugger. In Cursor, it is provided by the C/C++ extension published by Anysphere, the maker of Cursor. You can also use Cortex-Debug and clangd instead, see Alternative: Cortex-Debug and clangd.
- In the Extensions view, search for
@id:anysphere.cpptools. - Click on C/C++ (publisher Anysphere), then click Install.
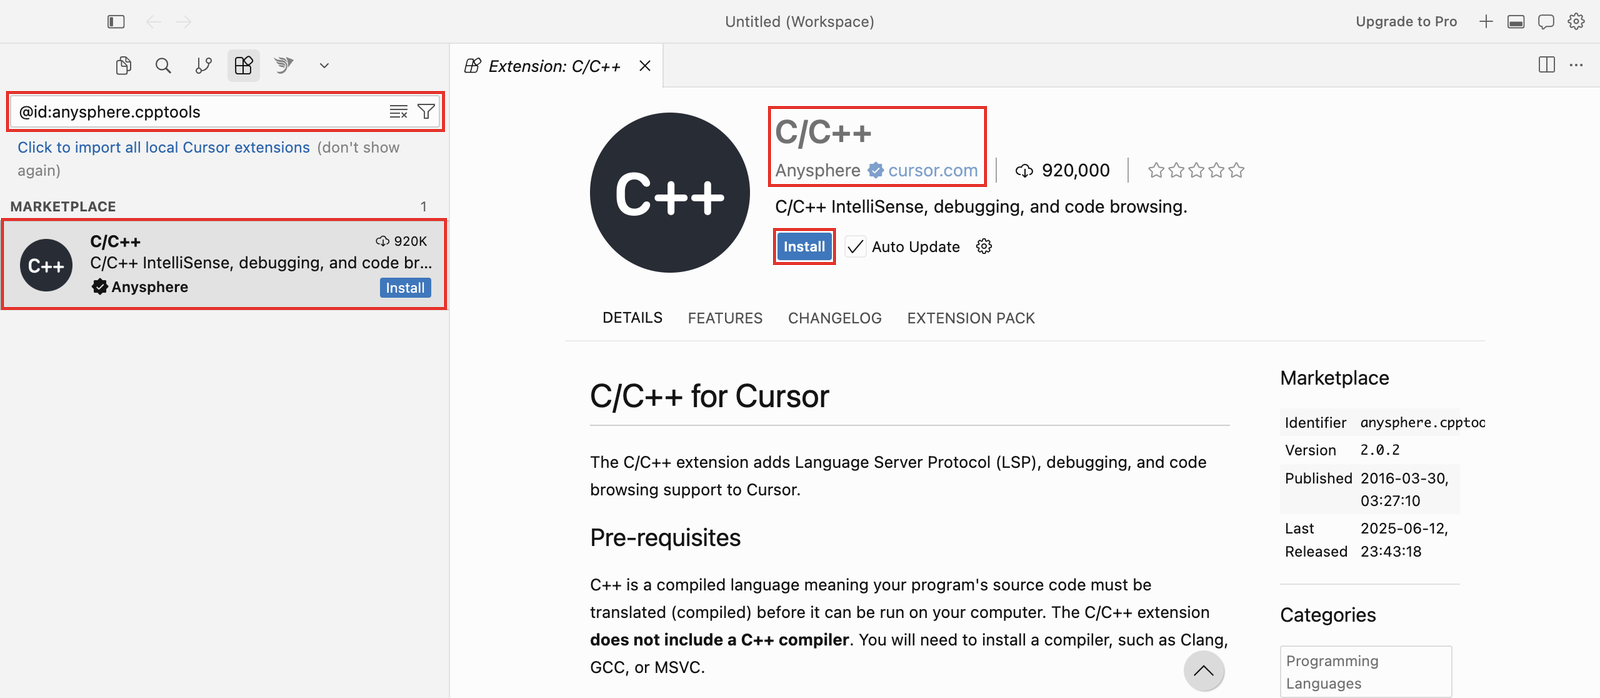
This extension is an extension pack: it also installs clangd, CodeLLDB and CMake Tools.
- Since Microsoft's C/C++ extension is not installed and clangd is, Workbench for Zephyr sets the IntelliSense provider of new applications to clangd (see "IntelliSense provider" in Applications).
- CMake Tools may show a "Select a Kit for zephyrproject" list as soon as it is installed. Press Escape: Workbench for Zephyr builds with west and does not use CMake Tools kits.
Alternative: Cortex-Debug and clangd
If you prefer, use Cortex-Debug and clangd instead of the C/C++ extension for Cursor. Together they replace what Microsoft's C/C++ extension does in VS Code, without installing CMake Tools and CodeLLDB:
| Role | C/C++ extension for Cursor | Alternative |
|---|---|---|
| Debugging | "C/C++ Debug (cppdbg)" backend | Cortex-Debug (@id:marus25.cortex-debug) |
| IntelliSense | clangd, installed with the pack | clangd (@id:llvm-vs-code-extensions.vscode-clangd) |
- Cortex-Debug is normally installed with Workbench for Zephyr. If it is missing, search for
@id:marus25.cortex-debugin the Extensions view and install it. When you debug, select one of the Cortex-Debug backends in the Debug Manager. - Search for
@id:llvm-vs-code-extensions.vscode-clangdand install clangd before you create your application: Workbench for Zephyr then selects clangd as its IntelliSense provider. For an application that already exists, right-click on it > Build Configuration > Change IntelliSense Provider (see Applications).
Install at least one of the two options. Without the C/C++ extension for Cursor or clangd, no C/C++ language server is installed and your application gets no IntelliSense.
Step 8: create an application
- Click on Add Application.
- Select West Workspace: the workspace created in Step 6.
- Select Toolchain: "Global Zephyr SDK".
- Select Board: type part of the board name or identifier to filter the list, for example
stm32f4_discofor "ST STM32F4 Discovery". - Keep "Create new application" selected.
- Select template: type
hello_worldand pick the first entry,deps/zephyr/samples/hello_world(not thecpporsysbuildvariants). - Project Name: the name of your application.
- Keep "West workspace application" and Debug preset checked.
- Click on Create.
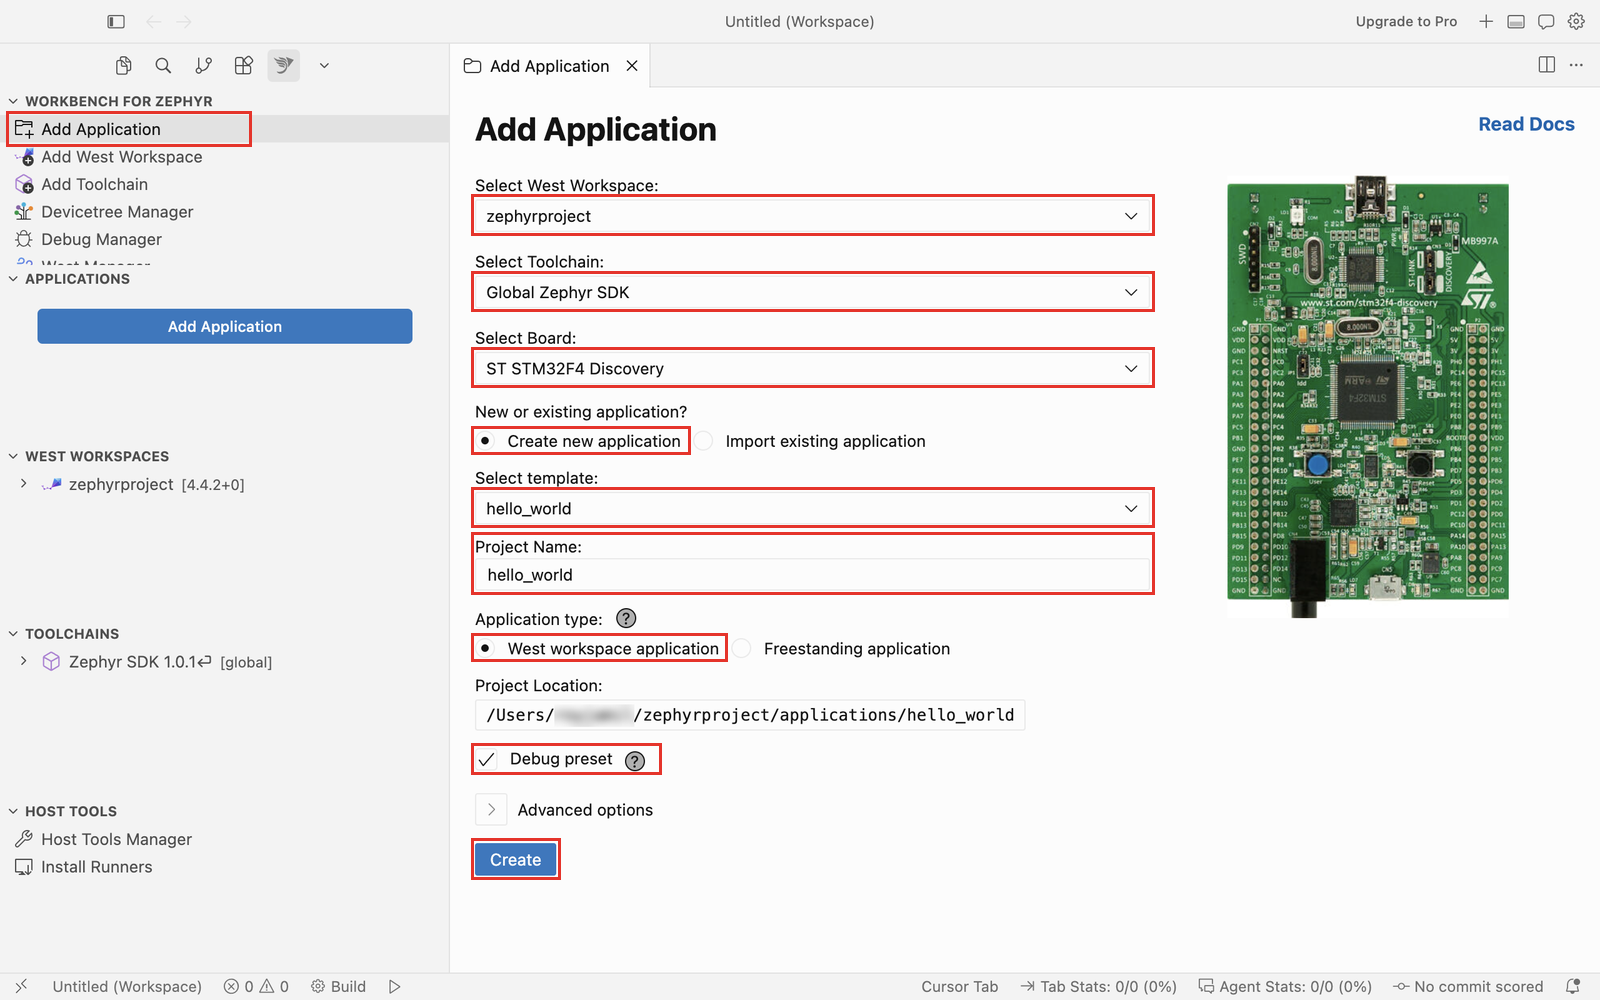
The application appears in the Applications view. See Applications for the other fields.
Step 9: build the application
Hover over the application in the Applications view and click on the Build (gear) button. You can also right-click on the application > Build.
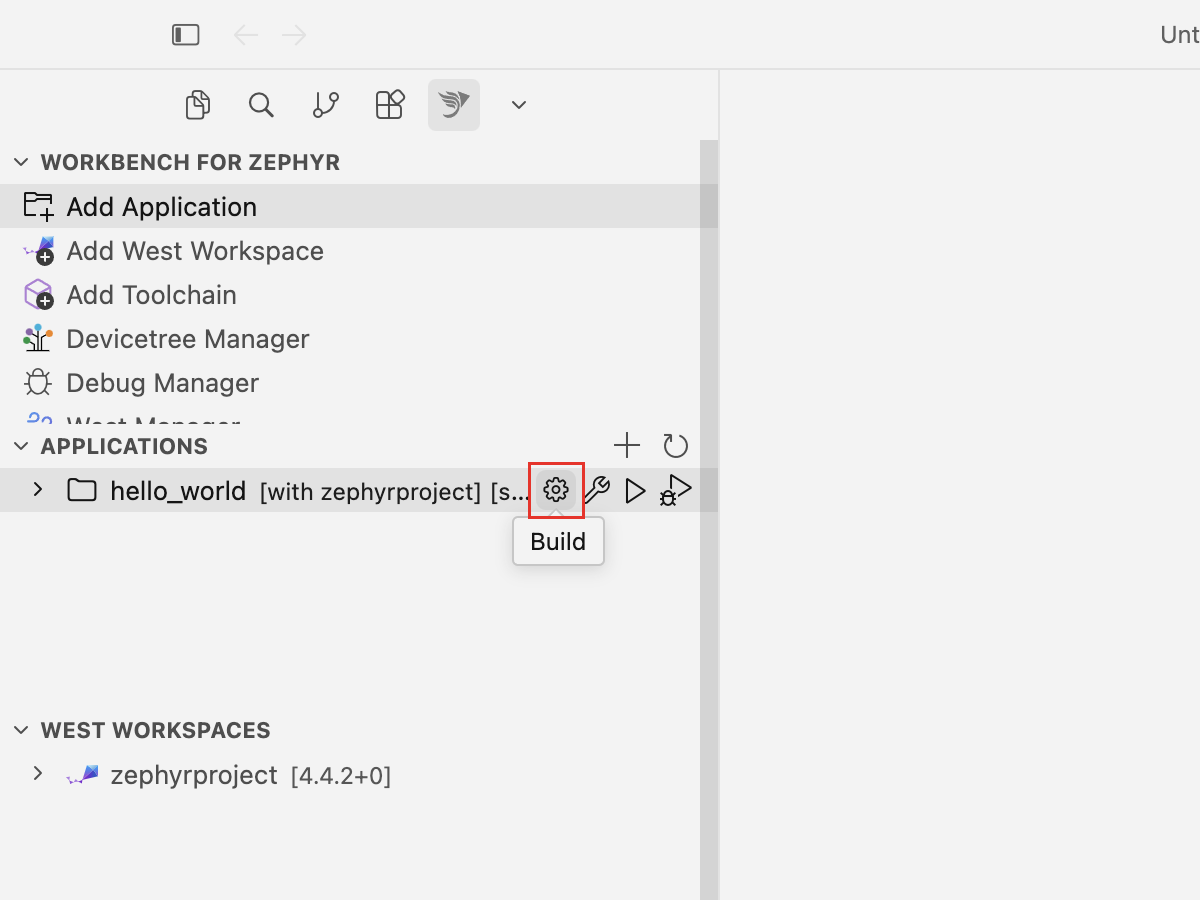
The build runs in the terminal and prints the memory usage of the image. To edit the code, open the source files from the Code Explorer node of the application. When a file of the application is open, the status bar also shows the Workbench for Zephyr Build and Debug buttons, next to the application name.
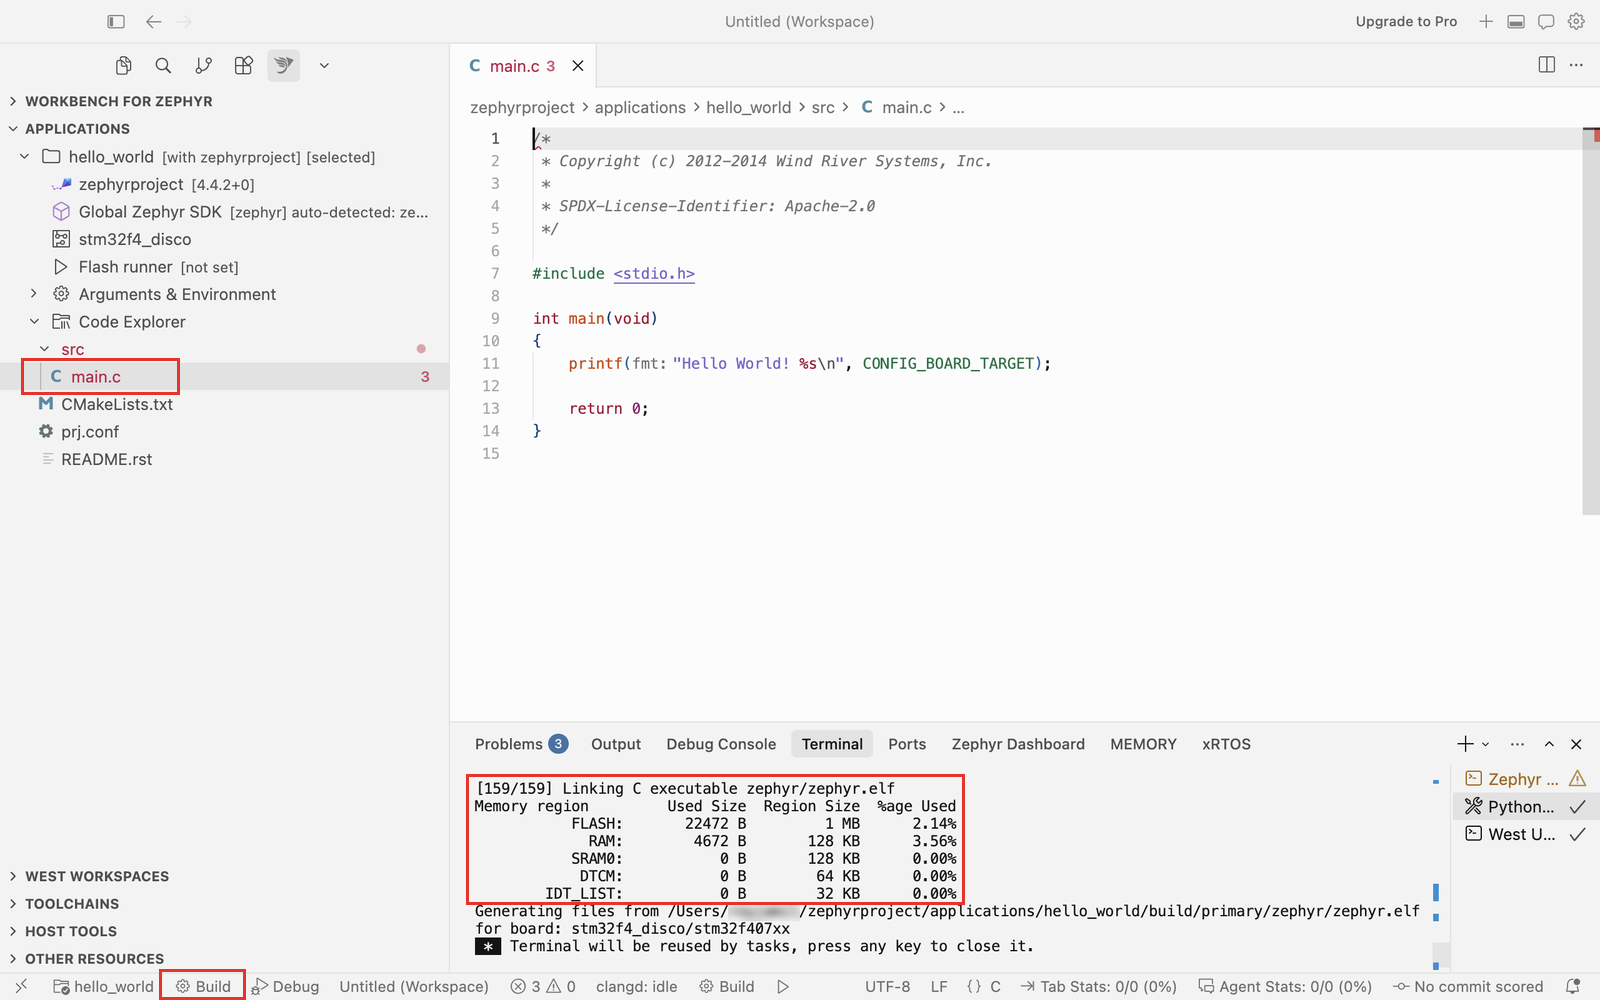
CMake Tools, installed in Step 7 with the C/C++ extension for Cursor, adds its own Build and run buttons to the status bar (tooltip "Build the selected target"). When no file of the application is open, it is the only Build button in the status bar. Use the Workbench for Zephyr Build button (its tooltip reads "Zephyr: Build" followed by the application name), not the CMake Tools one.
The Problems view may show clangd errors such as "Unknown argument: '-fno-reorder-functions'". clangd does not recognize some GCC options of the Zephyr build. These errors only affect the editor: the build itself is not impacted.
Next steps
From here on, Workbench for Zephyr works in Cursor as in VS Code, apart from the companion extensions described above. Follow the documentation:
- Flash your board and view its output: Flash and Run and the "Running the application" section of the macOS, Linux or Windows getting started guide. That section uses the Serial Monitor extension, which is not available in Cursor: read the output with a serial terminal or another serial monitor extension instead.
- Install the flash and debug tools of your board: Install Runners.
- Debug: Debug Session. In Cursor, the default "C/C++ Debug (cppdbg)" backend is provided by the C/C++ extension for Cursor (Step 7) instead of Microsoft's C/C++ extension. With the Cortex-Debug and clangd alternative, select a Cortex-Debug backend in the Debug Manager.
- Configure your application: Kconfig, Devicetree Manager, Multibuild.